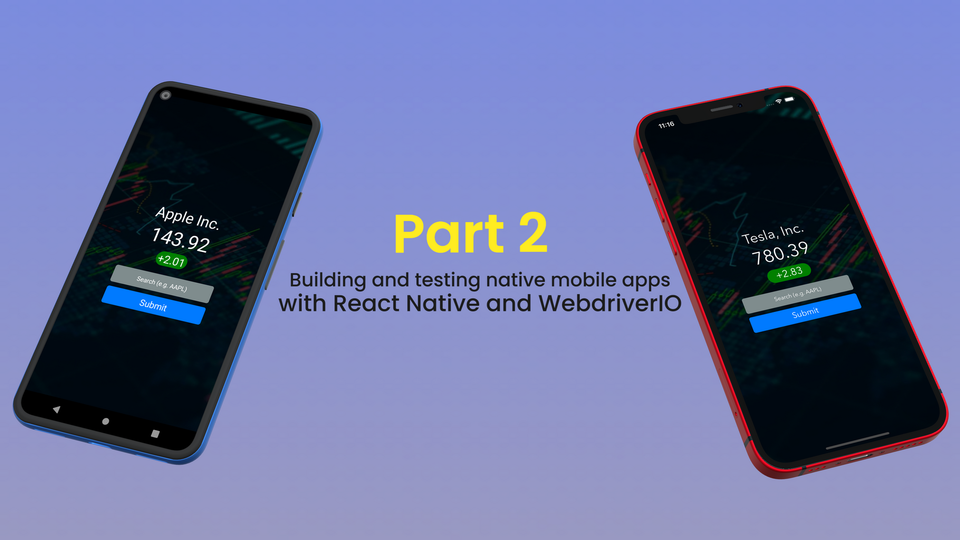
Part 2: Building and testing native mobile apps with React Native and WebdriverIO
In Part 1, we introduced React Native by building an app to check stock prices that runs on both iOS and Android. We will now explore how we can refactor our app to make it test automation friendly.

You can find the full source code for this React Native project here:
 nathankrishnan
Contents of this Guide
● Prerequisites
- Appium Desktop
● Interacting with UI Elements
- Finding Elements
- Performing Actions
● Adding Element Identifiers
- Updating the SearchBar Component
- Updating the StockView Component
● Creating Test Builds
- Updating our app.json
- Build for the iOS Simulator
- Build for the Android Emulator
● Inspecting our App
Prerequisites
Appium Desktop
Appium Desktop is a GUI desktop application that enables us to interactively explore our app in the context of a live Appium session. Using Appium Desktop we can determine the optimal UI element selectors to use before formally writing our automation tests. You can download Appium Desktop from the official GitHub repository:
appiumInteracting with UI Elements
At a conceptual level, the act of writing automation tests can be expressed as a two-step process:
- Finding the right UI element(s) in each view of the app under test
- Perform actions on the aforementioned UI elements
Appium provides different strategies we can use to find elements and perform actions on them. We will walkthrough the concepts in this section. In Part 3 we will put the knowledge to action by writing test automation code for our app using WebdriverIO.
Finding Elements
Analogous to how we can use CSS selectors to target HTML elements in the DOM of a web page, Appium provides different locator strategies we can use to find elements in an app. We provide the locator strategies with a selector, which is a string representation of the pattern to use when searching for the element.
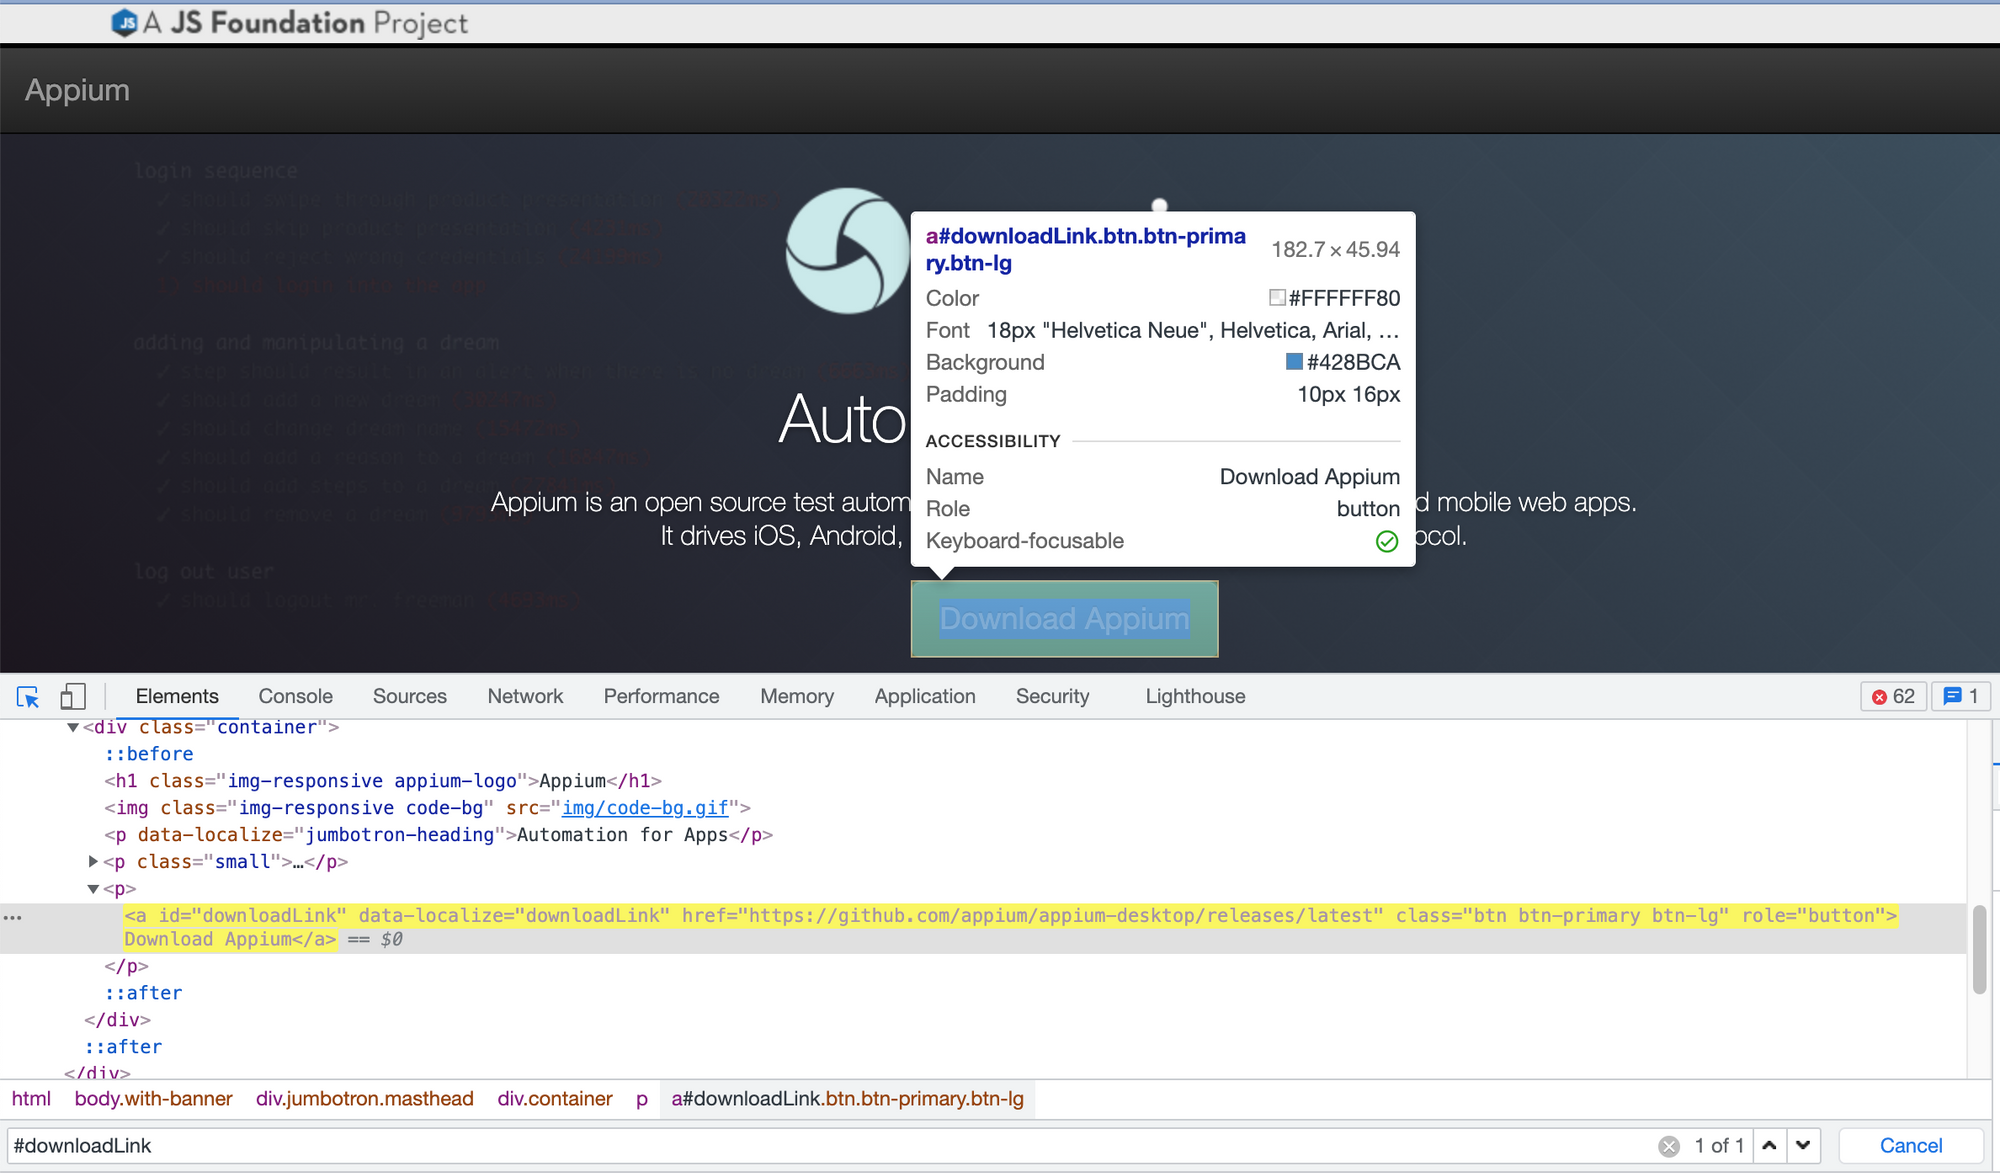
As an example in our analogy, if you navigate to http://appium.io in your browser and open up your browser’s developer tools, we can find the “Download Appium” button link by its element ID, which is “#downloadLink” by inspecting the button.
Let’s say we wanted to make the color of the button’s link text red. We could add a new CSS rule to the page, such as:
#downloadLink {
 color: red;
}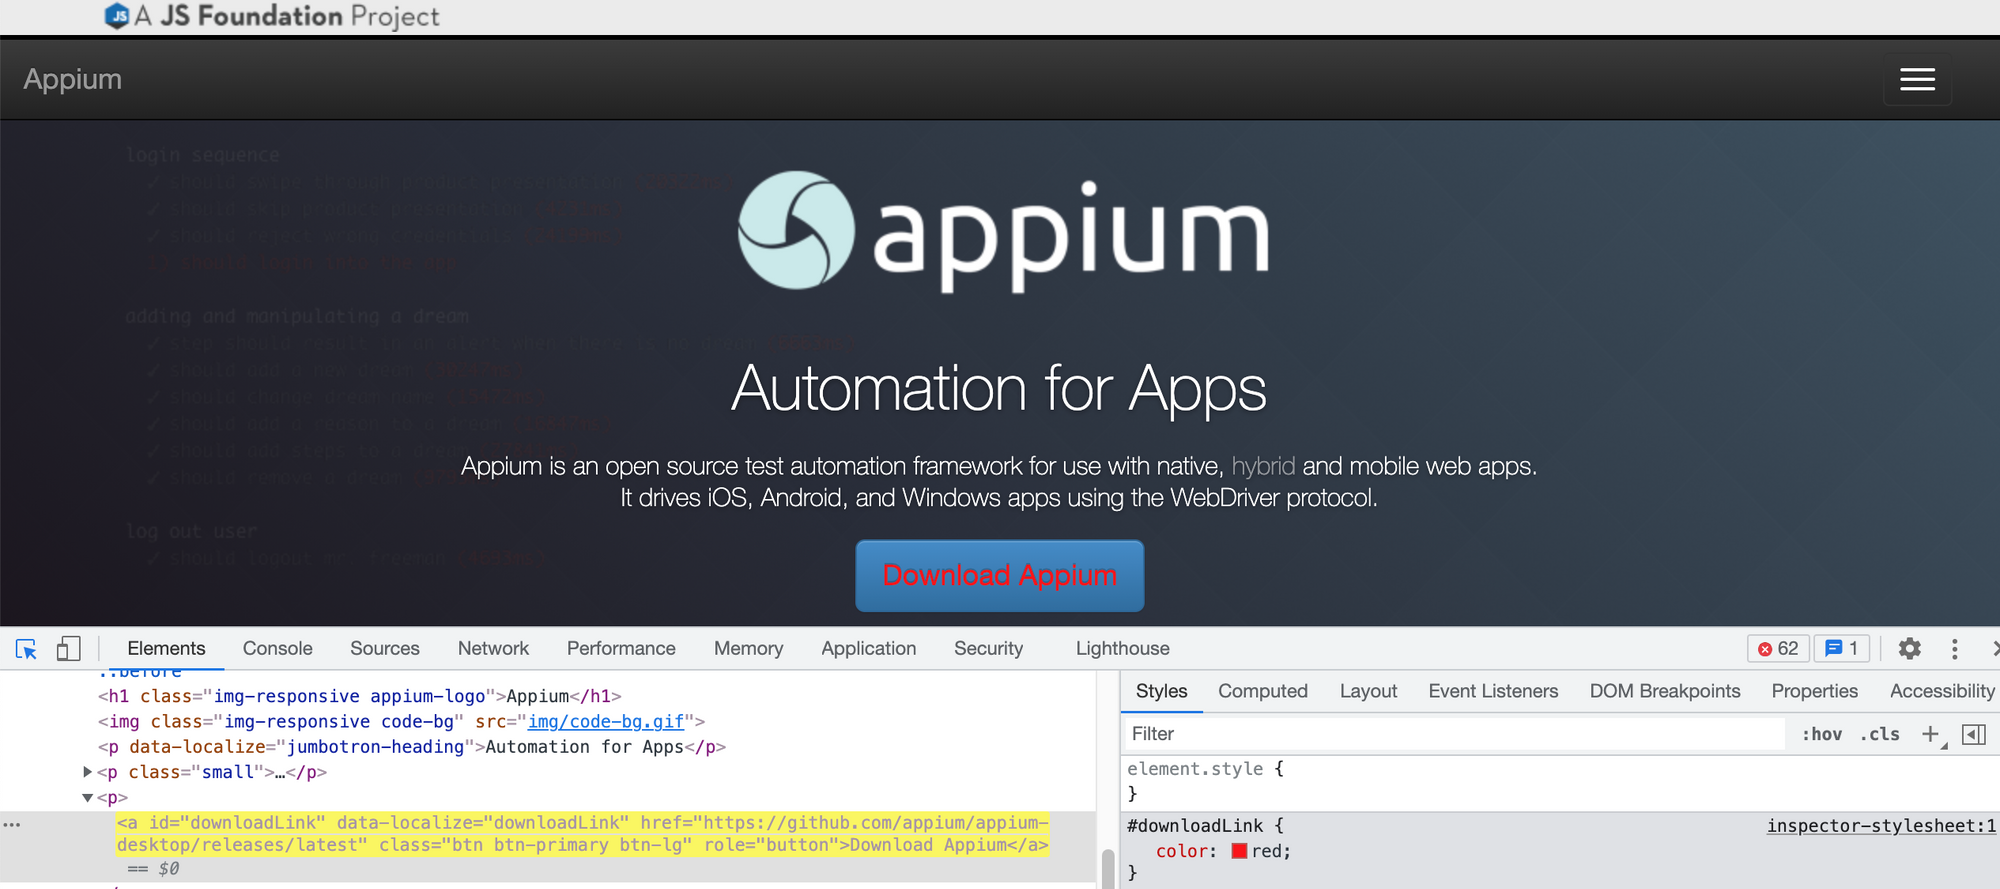
The rule we wrote could be interpreted as:
Select the element by the ID of “downloadLink” and perform the action of styling its text color to red.
/*
  Locator Strategy: Find the element by an ID
  Selector: #downloadLink
  Action: Set the text color to red
*/

#downloadLink {
 color: red;
}
In Appium, there are different locator strategies we use to find elements. We supply the locator strategies with a selector, which is the string representation of the pattern to use to find the element. For example in Appium using the WebdriverIO JavaScript client, this is how we can find a button element in an Android app by it’s ID:
const button = await driver.$("id:com.android.contacts:id/floating_action_button");Here’s an overview of the common locator strategies:
Performing Actions
Once you’ve found the right elements, you can perform actions on them. To continue with the previous WebdriverIO example, let’s perform a tap action on the button:
/*
  Locator Strategy: Find the element by an ID
  Selector: "id:com.android.contacts:id/floating_action_button"
  Action: Tap
*/

const button = await driver.$("id:com.android.contacts:id/floating_action_button");
await button.click();
Here’s an overview of the common element actions:
Note: there are also more advanced actions you can perform such as scrolling, flicking, long press, etc. To learn more take a look at the Commands > Interactions > Touch section of the Appium docs.
Adding Element Identifiers
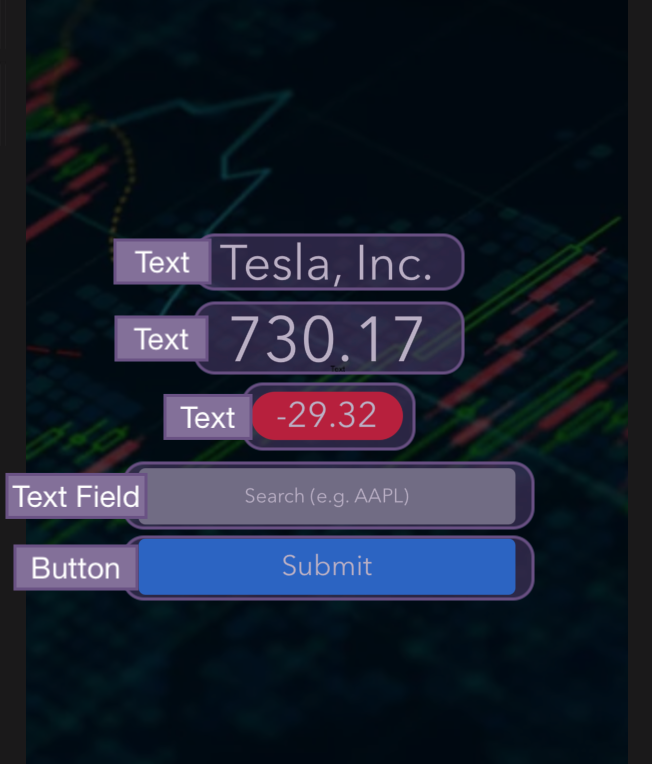
Let’s revisit our app project code. We will make code changes so that certain UI elements in our app have identifiers to make locating them easier in automation. Here are the elements in our app that we will need to add identifiers on:
In React Native, there are two props contained in core components that help us in this endeavor:
testID(Docs)
Maps to the element’s name on iOS and resource-id on Android, allowing you to use Appium's Find Element by ID selector strategy.
accessibilityLabel(Docs)
Maps to the element’s accessibility-id on iOS and content-desc on Android, allowing you to use Appium's Find Element by Accessibility ID selector strategy.
However there’s a subtle nuance with using them that I’ll explain. In React Native versions <= 0.63.4, components with the testID prop do not surface on Android when inspecting in Appium. As a result, you will have to use the accessibilityLabelprop instead. In React Native versions >= 0.64.3 this behavior has been fixed, allowing you to just use testID.
If you inspect the package.json in our project, you will see that the React Native version we are using is Expo SDK 42, which uses React Native 0.63. Expo bundles specific version of React Native in order to ensure their suite of helper tools are compatible with the changes in React Native versions.
That said, we’ll create a helper function to return the correct props based on the mobile platform OS. In the utilsdirectory of our project, create a new file called addTestIdentifiers.js. In this file add the following:
import { Platform } from 'react-native';

const addTestIdentifiers = (idName) => {
 return Platform.OS === 'android'
    ? { accessibilityLabel: idName }
    : { testID: idName }
};

export default addTestIdentifiers;
The Platform module allows us to conditionally run code based based on the mobile platform OS. Platform.OS will be android when running on Android and ios when running on iOS. Next, we will apply our helper function on our components to set the right test identifiers.
Updating the SearchBar Component
In components/SearchBar.js import our helper function right below the existing imports:
import addTestIdentifiers from '../utils/addTestIdentifiers';
In our SearchBar class component, navigate to the render() method and let's apply our helper function with test identifiers to our TextInput and TouchableOpacity components:
render() {
		const { placeholderTextInputLabelText } = this.props;
		const { textValue } = this.state;

		return (
			<View>
				<View style={styles.container}>
					<TextInput
						{...addTestIdentifiers('stockTickerSymbolSearchInput')}
						style={styles.textInput}
						value={textValue}
						placeholder={placeholderTextInputLabelText}
						placeholderTextColor="white"
						underlineColorAndroid="transparent"
						clearButtonMode="always"
						autoCorrect={false}
						onChangeText={this.handleChangeText}
						onSubmitEditing={this.handleSubmitEditing}
					/>
				</View>
				<TouchableOpacity
          {...addTestIdentifiers('stockTickerSymbolSearchBtn')}
          style={styles.submitButton}
          onPress={this.handleSubmitEditing}
      	>
					<Text style={[styles.buttonText, styles.textStyle]}>Submit</Text>
				</TouchableOpacity>
			</View>
		);
	}
Updating the StockView Component
We'll repeat the steps, but apply them in the context of our StockView component in components/SearchBar.js. Import the helper function in this file. In the return() of our StockView functional component, we will apply our helper function to the Text components:
export default function StockView(props) {
	return (
		<View>
			<Text
        {...addTestIdentifiers('stockNameText')}
        style={[styles.mediumText, styles.textStyle]}>
          {props.stockName}
      </Text>
			<Text
        {...addTestIdentifiers('stockPriceText')}
        style={[styles.largeText, styles.textStyle]}>
          {props.stockPrice}
      </Text>
			<View style={[styles.rectangleShapeContainer, props.changeType === "+" ? styles.positiveChange : styles.negativeChange]}>
				<Text
          {...addTestIdentifiers('stockChangeValueText')}
          style={[styles.smallText, styles.textStyle]}>
            {props.changeValue}
        </Text>
			</View>
			<SearchBar
				placeholderTextInputLabelText="Search (e.g. AAPL)"
				onSubmit={props.onSubmit}
			/>
		</View>
	)
}
This completes the code changes we need to make. We can now proceed to building our app for iOS and Android.
Creating Test Builds
There are two ways we can create our app builds to test on:
- Use Expo’s Cloud Build Service
- Build on our local machine from Xcode and Android Studio
For the sake of simplicity and convenience we’ll go with the former option. To use Expo’s cloud app build service, first create a free account on the Expo developer website:


We will use the newly created Expo credentials momentarily.
Updating our app.json
Before we create a build of our app, we’ll update the app.json file in our project to include an iOS Bundle ID and Android Package Name for our app. In the app.json file, update the "ios" and "android" sections of the JSON to include:
"ios": {
    "bundleIdentifier": "com.name.stockprice",
    "buildNumber": "1.0.0"
  },
  "android": {
    "package": "com.name.stockprice",
    "versionCode": 1
}- The iOS
bundleIdentifierand the Androidpackagefields use reverse DNS notation. Feel free to provide it a custom name if you'd like. Personally, I'll go withcom.nathankrishnan.stockprice. - The iOS
buildNumberand AndroidversionCodelet us set an internal build number for our own tracking purposes. For more information on the version schemes, please take a look at CFBundleShortVersionString section of the Apple Developer docs and the Version your app section of the Android Developer docs.
Build for the iOS Simulator
Run the following command from the terminal in our project’s working directory:
$ expo build:ios -t simulatorYou’ll be prompted to authenticate and specify to log in with an existing account:
An Expo user account is required to proceed.
✔ How would you like to authenticate? › Log in with an existing Expo account
Your project will be uploaded to Expo’s cloud build service, where they will compile the app on your behalf. In the terminal output will be a link to display the build details of your app. Once the build has completed, you will see a download option from the Expo web service:
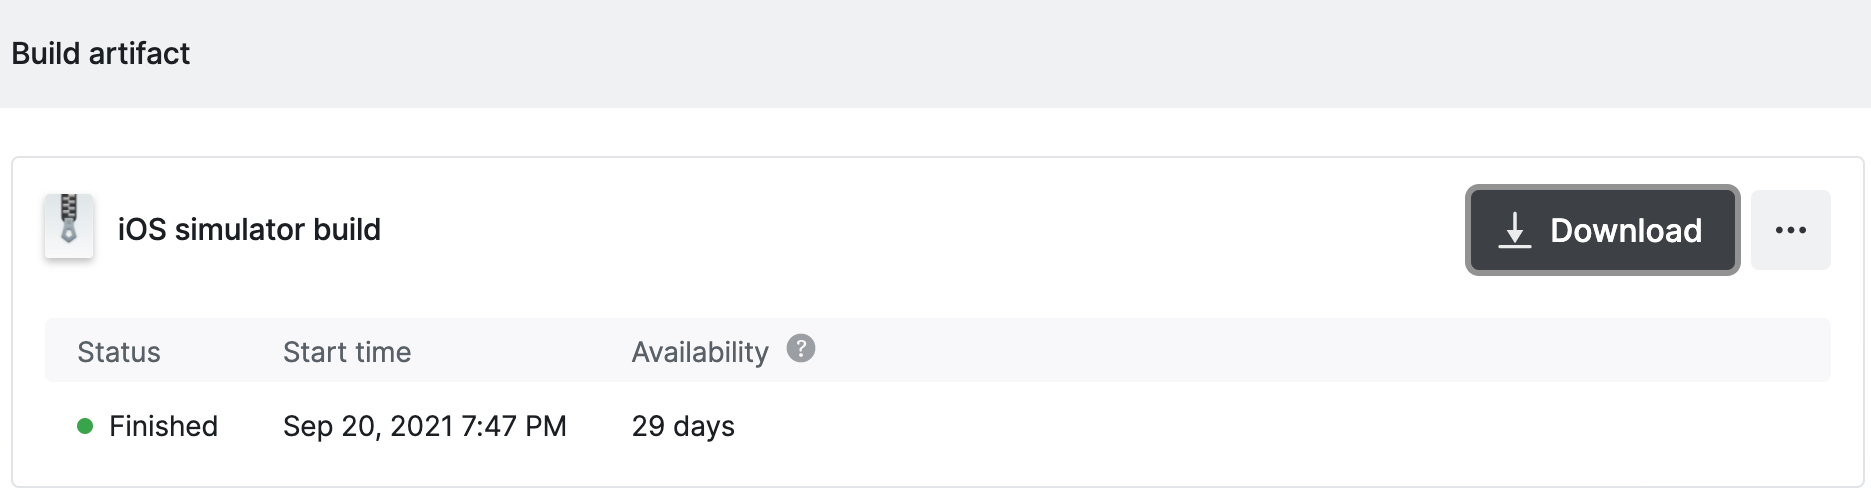
Download your build, which will have a file extension of tar.gz. To untar the file, run the following command from your terminal:
$ tar -xvzf react-native-stock-price-app.tar.gzThis will extract our .app from the archive. We can install the .app on our iOS Simulator by either dragging and dropping the file onto the simulator or by running the following command from the terminal:
$ xcrun simctl install booted react-native-stock-price-app.appBuild for the Android Emulator
Run the following command from the terminal in our project’s working directory:
$ expo build:android -t apkYou will be prompted to either upload an Android keystore or have one generated for you. Select generate new keystore:
✔ Would you like to upload a Keystore or have us generate one for you?
If you don't know what this means, let us generate it! :) › Generate new keystore
Just like in the previous section, we will get a link to download our .apk once Expo's cloud build service has finished compiling it.
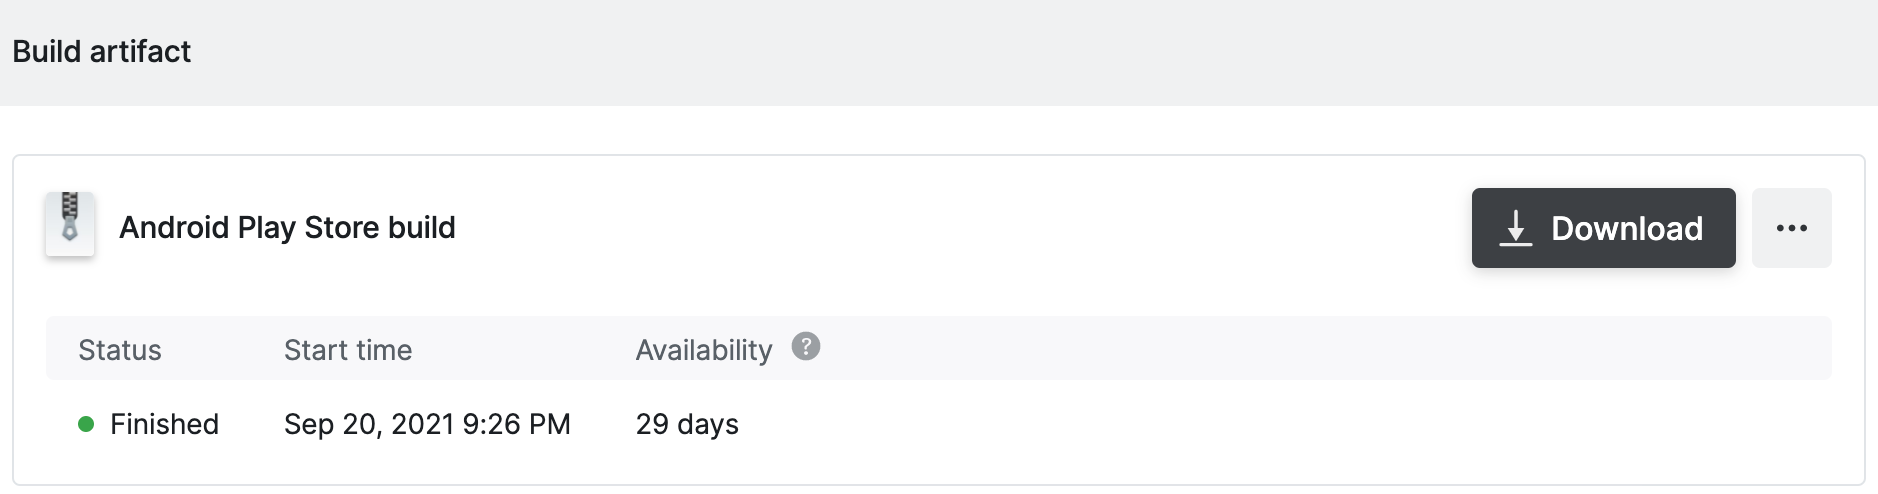
Once you’ve downloaded the .apk, you can install it on your Android Emulator by either dragging and dropping the .apk onto the emulator or by using adb:
$ adb install react-native-stock-price-app.apkInspecting our App
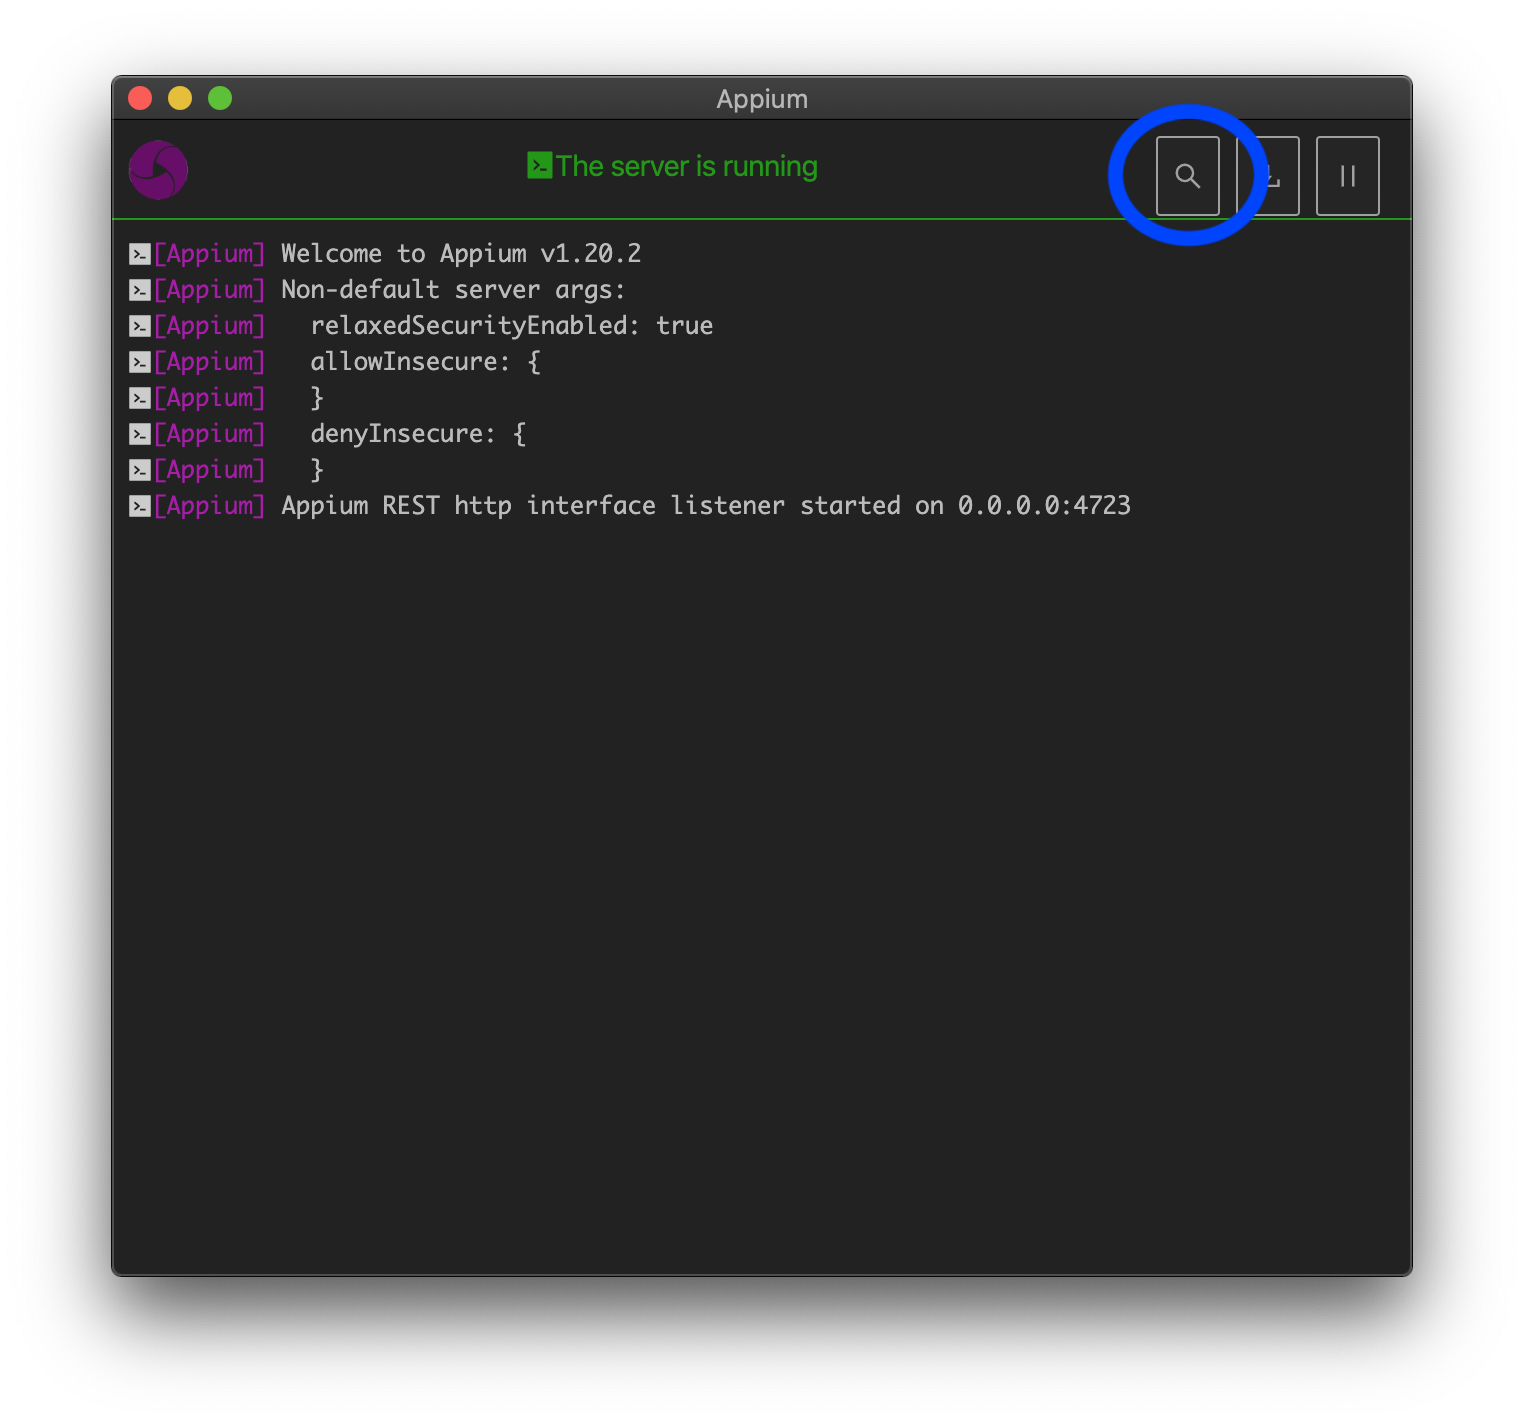
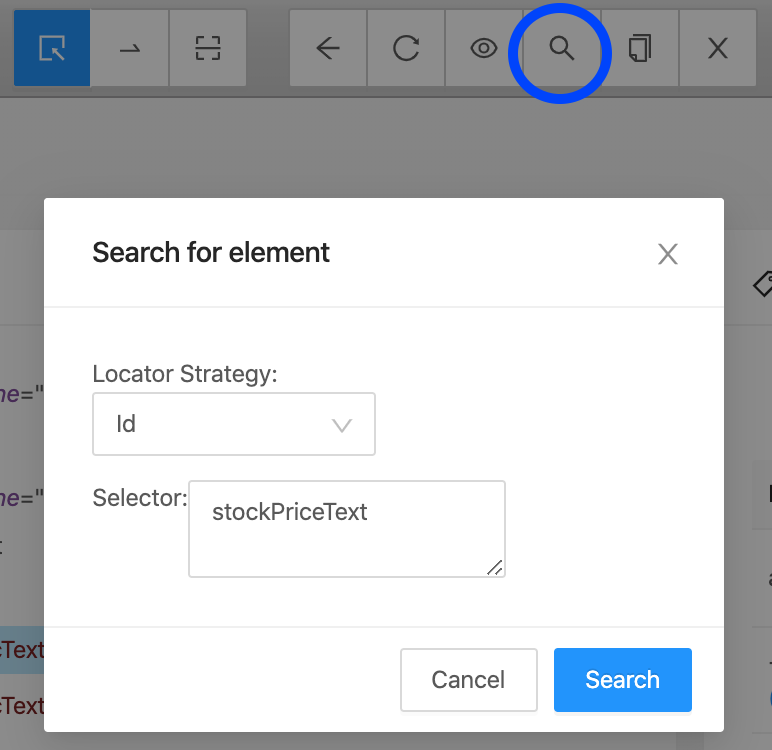
Launch Appium Desktop application on your computer and click on the “Start Server” button when the Appium window appears. This will start Appium Server locally on your machine. Click on the magnifying glass icon at the top right side, which will start an inspector session.
We’ll first start with inspecting our iOS app. To do this we’ll provide the following desired capabilities:
- platformName: iOS
- automationName: XCUITest
- deviceName: (I’ll describe this below)
- platformVersion: (I’ll describe this below)
- bundleId: The
bundleIdentifierwe specified in ourapp.json
To get the deviceName and platformVersion of your iOS Simulator, run the following command from your terminal:
$ xcrun xctrace list devicesThis will list the iOS Simulator device names and their associated iOS versions. Here’s an example of what the output format looks like:
== Simulators ==
iPhone 12 (14.2) (7E812A11-4E24-481C-91E2-9B5968EE3F08)
iPhone 12 (14.2) + Apple Watch Series 5 - 44mm (7.1) (433317EF-F052-43CD-81E5-7190DDABBF45)
iPhone 12 Pro (14.2) (7CD93B67-5E61-4B0C-BADD-082270F7D184)
iPhone 12 Pro (14.2) + Apple Watch Series 6 - 40mm (7.1) (BFC48433-8B37-4483-91E8-A31660D7F9AC)
iPhone 12 Pro Max (14.2) (B09F4906-E4A3-458C-B4FF-16F66E0C98CF)
iPhone 12 Pro Max (14.2) + Apple Watch Series 6 - 44mm (7.1) (04FD9572-5ED8-4E52-B8D6-7194DC07BFBE)
iPhone 12 mini (14.2) (73FE8905-6225-4AF6-AD07-04DC0476F584)
iPhone 12 mini (14.2) + Apple Watch Series 5 - 40mm (7.1) (EA5F7B36-A9CB-412E-B81C-A93249560EAE)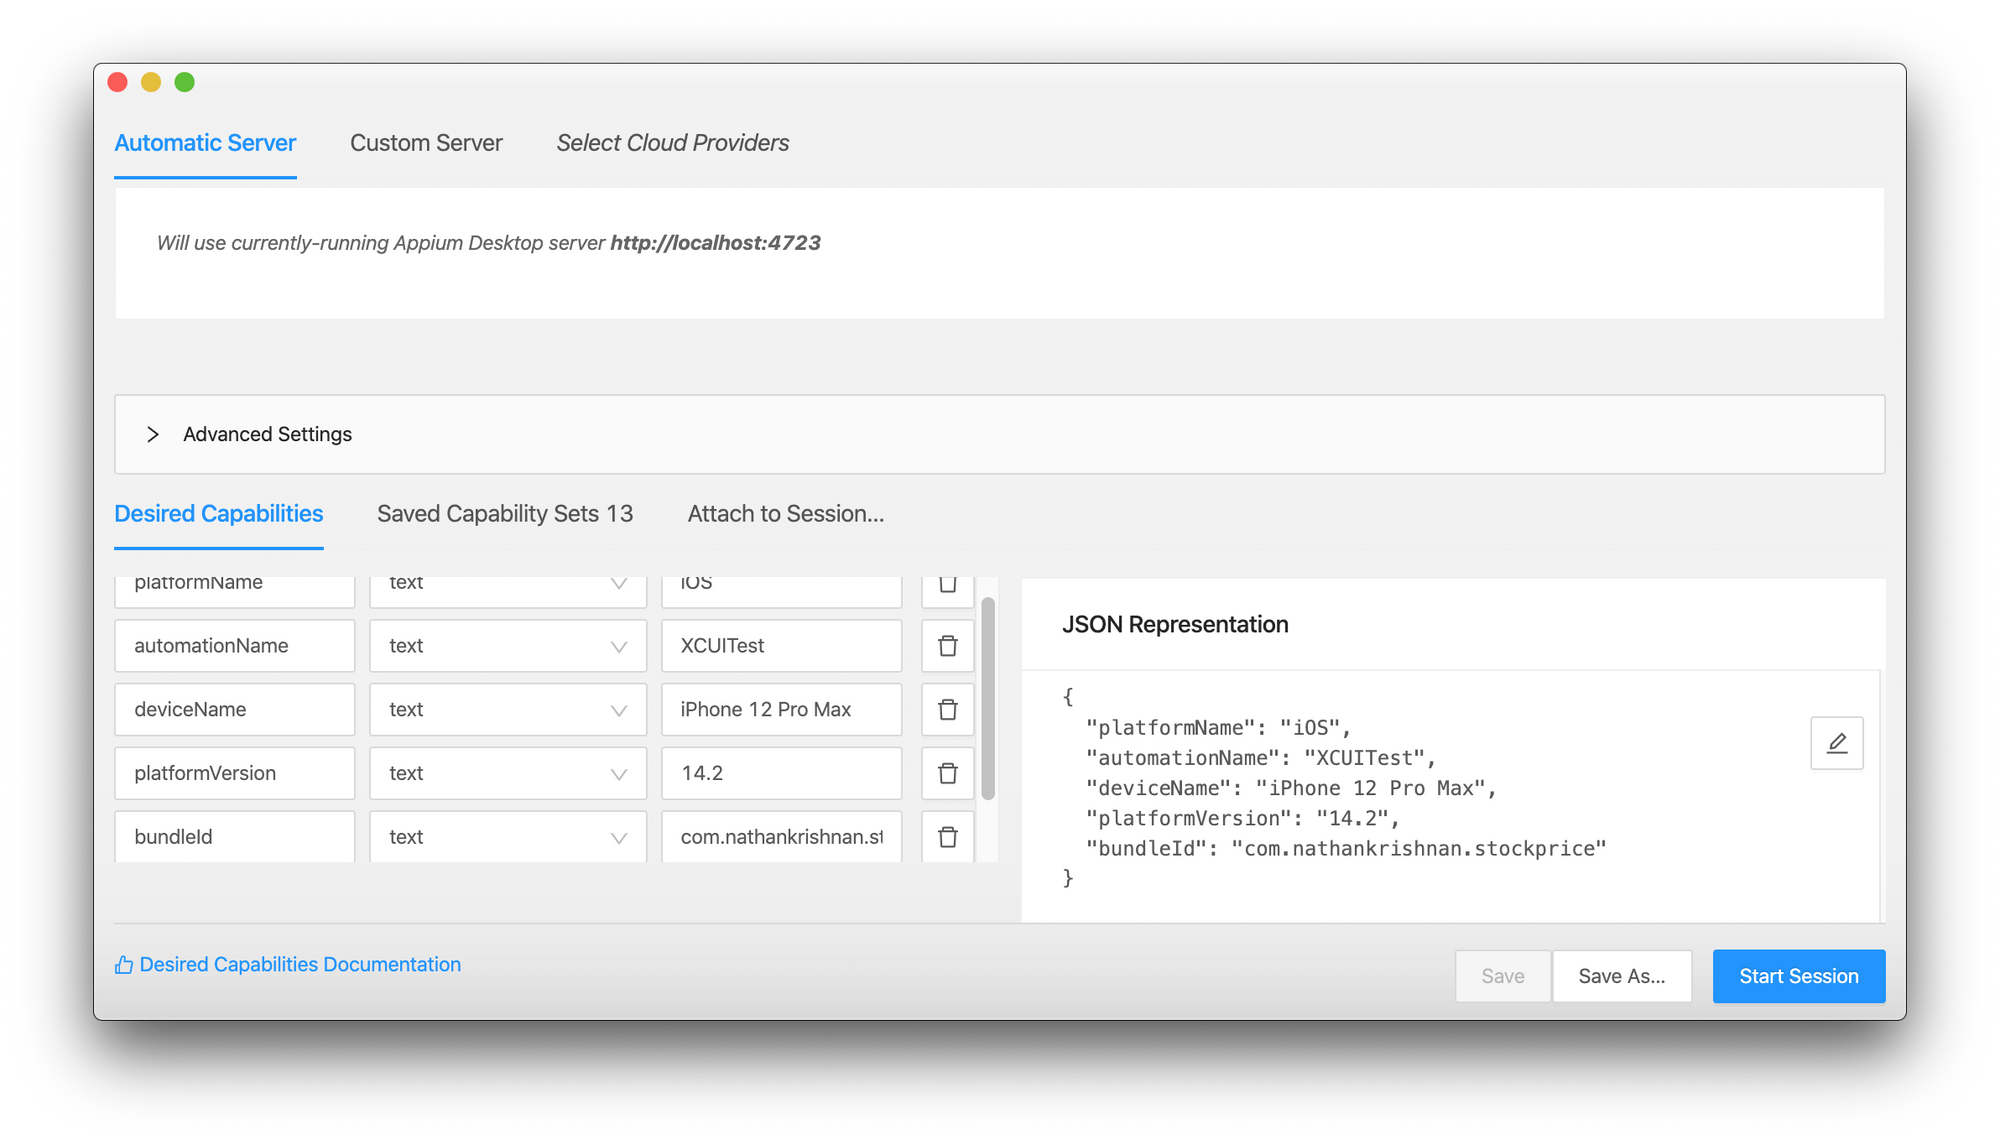
Note: If you have not ran an Appium session before on the target iOS Simulator, the first session may take some time. That said, have no fear it’s actually normal. Appium will first check to see if there is an existing WebDriverAgent runner app installed on the device. If it’s not there, it will first compile and install it on the device. WebDriverAgent is essentially the intermediary app Appium uses at launch and the WebDriverAgent runner app will launch our app’s bundle ID.
This will launch an inspector session for our app. This gives us the ability to interactively explore the view hierarchy of our app to determine the optimal locator strategies, and their associated selectors, before we formally write our automation tests. Go ahead and inspect our app! You’ll see that our test identifiers appear as expected.
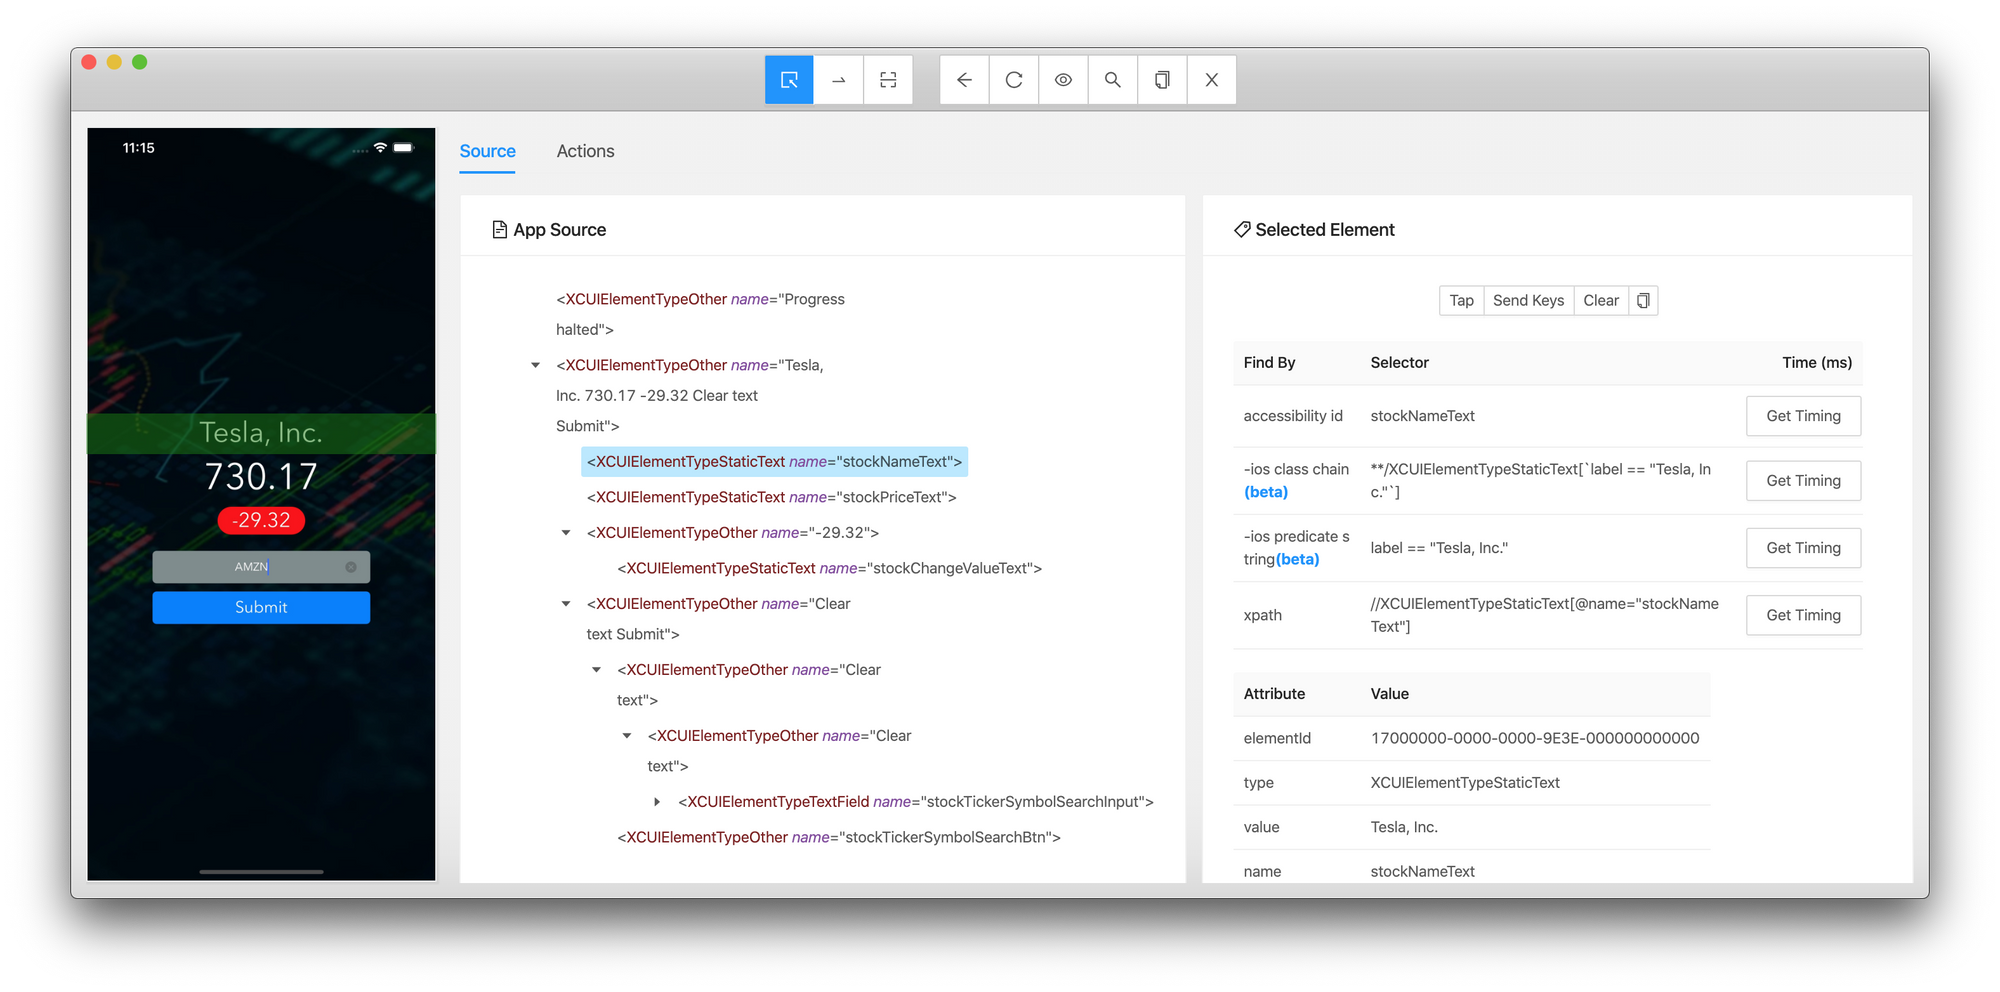
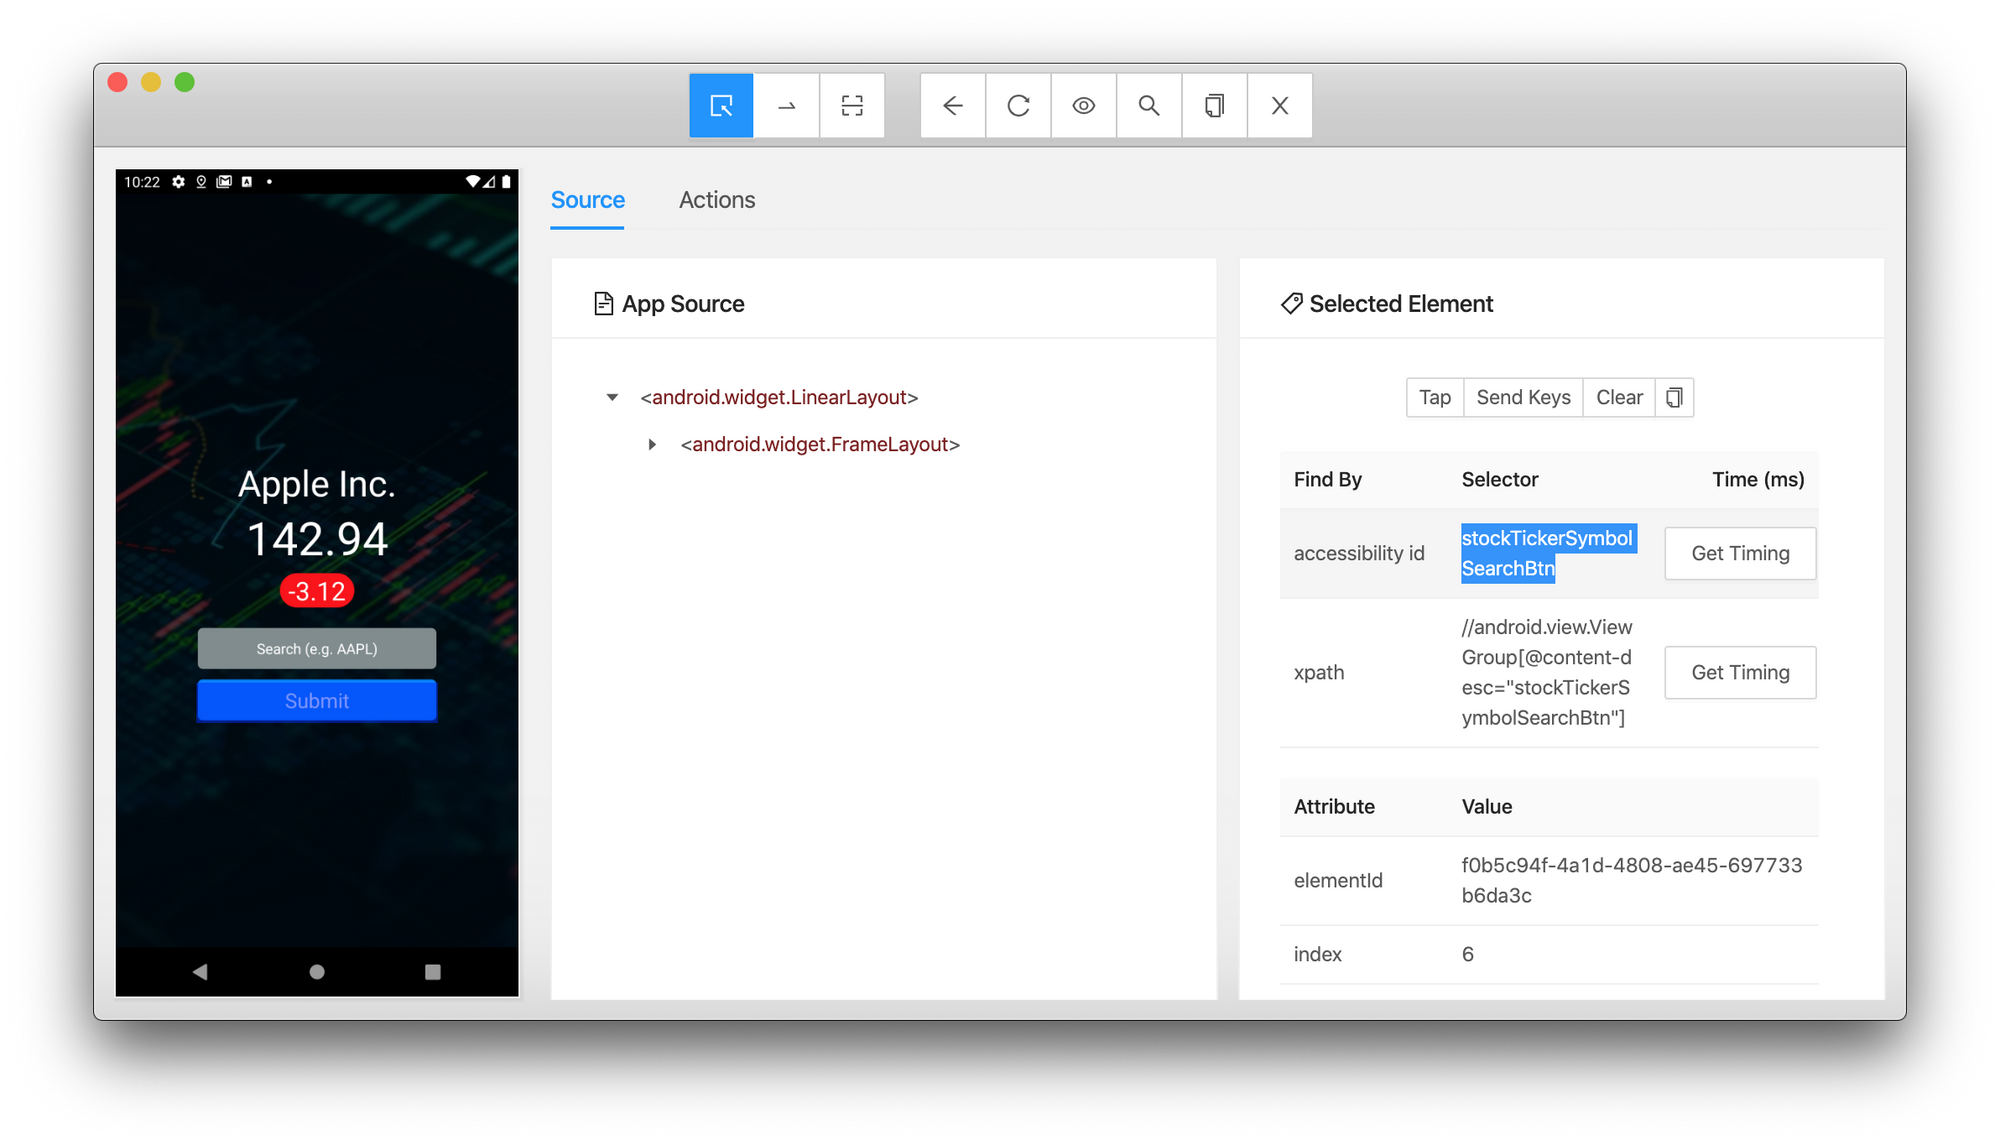
Note: On iOS our test identifiers can be located by both locator strategies of ID and Accessibility ID. However on Android, they will be locatable with the locator strategy of Accessibility ID due to the subtle nuance of React Native versions, mentioned in the Adding Element Identifiers section.
Inspecting the Android build of our app on the Android Emulator is similar, albeit we will need to provide different capabilities:
- platformName: Android
- automationName: UiAutomator2
- deviceName: Android Emulator
- appPackage: The
packagewe specified in ourapp.json - appActivity:
host.exp.exponent.LauncherActivity
Note: Expo automatically created the appActivity name for us. In my opinion, the most straightforward way of determining this would be to use apktool, which you can install via Homebrew — brew install apktool. If you run apktool d <your-app.apk> this will decompile the apk, giving us access to the AndroidManifest.xml file. The Android Manifest file outlines the package name, app activity, permissions, and much more.
In similar fashion, we now have a live inspector session for our Android app.
Next Steps
Congratulations, you now have a compiled app build for iOS and Android that contains the crucial element identifiers for test automation! In Part 3, we will write automation tests for our app using WebdriverIO.
Member discussion