Creating Swift Packages in Xcode
Creating Swift packages makes it easier for you to maintain and share your own dependencies. Xcode has built-in support for the Swift Package Manager, allowing you to easily distribute packages through GitHub and import them in your projects. I will walkthrough and demonstrate this process by creating a package for fetching weather information.
You can find the source code for the example package created in this guide here:
 nathankrishnan
Contents of this Guide
- Scaffold a New Package
- Package Manifest
- Add Your Code
- Adding Dependencies in the Package Manifest
- Creating the Weather library
- Publishing to GitHub
- Sign In to GitHub from Xcode
- Create a new Remote Repository
- Creating a Version Tag
- Pushing to the Remote Repository
- Using a Package in an Xcode Project
- Using a package in a UI Test
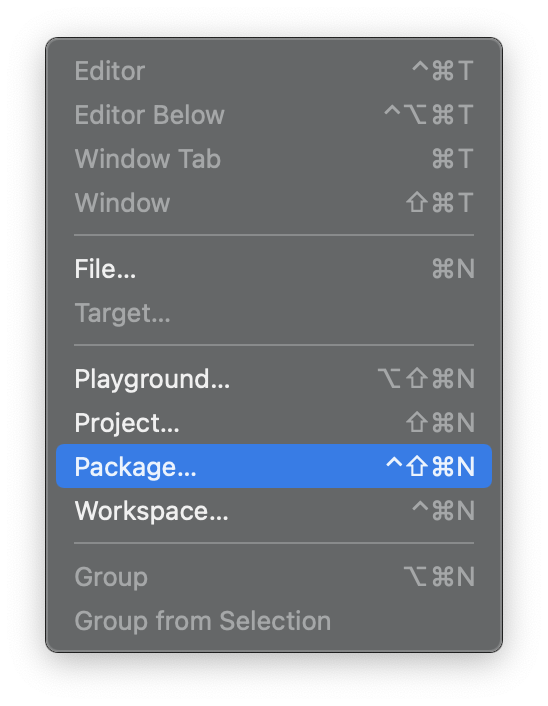
Scaffold a New Package
Open Xcode and from the menu bar select File > New > Package:
A dialog menu will appear to provide a name for your package and save it on your local machine. I'll name the package "Weather." Ensure that Create a Git repository on my Mac is checked under Source Control.
Package Manifest
Xcode will generate the scaffold for our newly created package and display the Package.swift file, which serves as the package manifest. This file defines the package's name and its contents. Here's an example of what it looks like:
// swift-tools-version:5.5
// The swift-tools-version declares the minimum version of Swift required to build this package.

import PackageDescription

let package = Package(
    name: "ExamplePackage",
    products: [
        // Products define the executables and libraries a package produces, and make them visible to other packages.
        .library(
            name: "ExamplePackage",
            targets: ["ExamplePackage"]),
    ],
    dependencies: [
        // Dependencies declare other packages that this package depends on.
        // .package(url: /* package url */, from: "1.0.0"),
    ],
    targets: [
        // Targets are the basic building blocks of a package. A target can define a module or a test suite.
        // Targets can depend on other targets in this package, and on products in packages this package depends on.
        .target(
            name: "ExamplePackage",
            dependencies: []),
        .testTarget(
            name: "ExamplePackageTests",
            dependencies: ["ExamplePackage"]),
    ]
)
- A module called
PackageDescriptionis imported, which allows us to instantiate aPackageobject. - We provide the
Packageobject with a name, list of products, a list of dependencies, and list of targets. productscontain the libraries from theSourcesdirectory that we want to surface to the end user.dependencieslist the external packages that your package uses.targetsare the modules, and their associated dependencies, that are intended to be built together.
The the Package object also accepts a platforms parameter, where you can pass the OS platforms supported by your package. For example:
    platforms: [
        .iOS(.v13),
        .macOS(.v10_12)
]Add Your Code
The convention is that your source code files reside in a subfolder of your package's Source directory and have the same name as the target they belong to. In this example, I've created a packaged named "Weather" and Xcode has scaffolded a Weather subdirectory with a Weather.swift file. We will use the MetaWeather API to retrieve the current weather conditions for a given city. For now I'll scaffold the Weather.swift file:
public class Weather {
    public let city: String

    public init(forCity city: String) {
        self.city = city
    }

    internal func getLocationId() {

    }

    public func getCurrentConditions() {

    }

    internal func convertCelToFar() {

    }
}Adding Dependencies in the Package Manifest
The MetaWeather API accepts JSON for the request payload and also sends responses back in JSON. To make the JSON serialization and parsing simple, we will use the SwiftyJSON package. We will revisit the Package.swift manifest and add a package dependency for SwiftyJSON. Conveniently, we can provide the GitHub Repo URL and a version constraint:
    dependencies: [
        .package(url: "https://github.com/SwiftyJSON/SwiftyJSON.git", from: "4.0.0")
]After you add a dependency package, the Xcode project navigator will update to reflect the change by adding a Package Dependencies section:
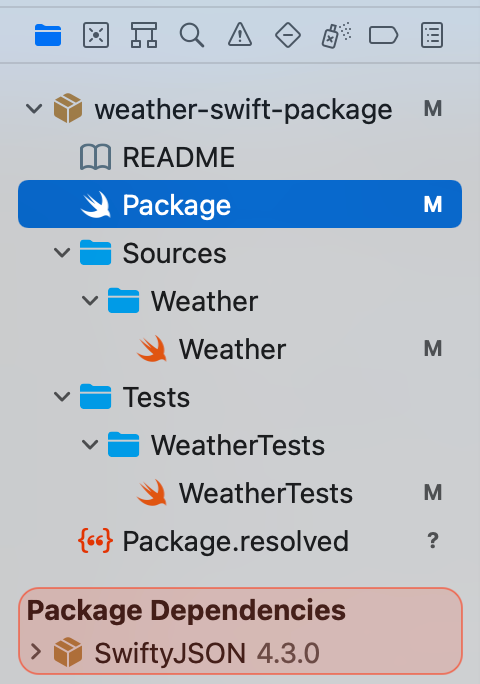
This package provides a module called SwiftyJSON that we can import in our source code. As a result, we'll update our manifest target accordingly:
    targets: [
        .target(
            name: "Weather",
            dependencies: ["SwiftyJSON"]),
        .testTarget(
            name: "WeatherTests",
            dependencies: ["Weather"]),
]Creating the Weather Library
In Weather.swift we will create a publicly accessible class called "Weather" that will accept a city and have a method for returning the current weather conditions from the MetaWeather API. It's important to apply the right access levels to the variables and functions in your library to ensure that the end user can access what they need. For a refresher on access levels, please take a look at the official docs. Replace the code in Weather.swift with:
import Foundation
import SwiftyJSON

public class Weather {
    public var city: String
    public var condition: String?
    public var temperature: String?
    private let baseURL = URL(string: "https://www.metaweather.com/api/location/")
    private let dispatchGroup = DispatchGroup()


    public init(forCity city: String) {
        self.city = city.addingPercentEncoding(withAllowedCharacters: .urlQueryAllowed) ?? city.lowercased()
        let _ = try? getCurrentConditions()
    }

    internal func fetchJSON(path: String, completion: @escaping (Result<JSON, Error>) -> Void) {
        enum fetchJSONError: Error {
            case invalidURL
            case missingData
        }

        guard let url = URL(string: path, relativeTo: baseURL) else {
            completion(.failure(fetchJSONError.invalidURL))
            return
        }

        let dataTask = URLSession.shared.dataTask(with: url) { (data, urlResponse, error) in
            if let error = error {
                completion(.failure(error))
                return
            }

            guard let data = data else {
                completion(.failure(fetchJSONError.missingData))
                return
            }

            do {
                let jsonResult = try JSON(data: data)
                completion(.success(jsonResult))
            } catch {
                completion(.failure(error))
            }

        }

        dataTask.resume()
    }

    internal func getLocationId() throws -> Int? {
        var locationId: Int?
        var fetchError: Error?

        dispatchGroup.enter()
        fetchJSON(path: "search/?query=\(self.city)") { result in
            switch result {
            case .success(let json):
                locationId = json[0]["woeid"].int
                self.dispatchGroup.leave()
            case .failure(let error):
                print("Request failed with error: \(error)")
                locationId = nil
                fetchError = error
                self.dispatchGroup.leave()
            }
        }

        dispatchGroup.wait()
        if let fetchError = fetchError {
            throw fetchError
        }
        return locationId
    }

    public func getCurrentConditions() throws -> [String: String]? {
        var weatherInfo: [String: String] = [:]
        var fetchError: Error?

        guard let locationId = try getLocationId() else {
            return nil
        }

        dispatchGroup.enter()
        fetchJSON(path: "\(locationId)") { [unowned self] result in
            switch result {
            case .success(let json):
                let consolidatedWeatherInfo = json["consolidated_weather"][0]
                weatherInfo["condition"] = consolidatedWeatherInfo["weather_state_name"].string
                weatherInfo["temperature"] = "\(convertCelToFar(celsiusTemp: consolidatedWeatherInfo["the_temp"].doubleValue)) °F"
                condition = weatherInfo["condition"]
                temperature = weatherInfo["temperature"]
                dispatchGroup.leave()
            case .failure(let error):
                fetchError = error
                dispatchGroup.leave()
            }
        }

        dispatchGroup.wait()
        if let fetchError = fetchError {
            throw fetchError
        }
        return weatherInfo
    }

    internal func convertCelToFar(celsiusTemp: Double) -> Int {
        return Int((celsiusTemp * 9/5)) + 32

    }
}I'll summarize the code we've added:
- We've imported the
SwiftyJSONthird party dependency that we added from our Package Manifest earlier. - From the MetaWeather API we will retrieve the current weather condition and temperature for a given city that the end user will specify.
- In order to get this data, we'll have to make two API calls: one to get the MetaWeather location ID that corresponds to the given city and another to get the current weather information for the location ID.
- We'll initialize the Weather struct with a user provided city and URL encode the string to account for multi-word cities like
Las VegasorNew York. fetchJSON()is an internal helper method for making the network request to API endpoints. It usesURLSession'sdataTask(with:completionHandler:)to make a request asynchronously in the background. Once the request has completed, or failed, the result will be sent to the completion handler. The completion handler accepts a Result enum, where we can provide the associated JSON data or error. For convenience with error handling, we've created a custom error type calledfetchJSONErrorto represent cases where the provided URL is invalid or if the data fetched is missing.getLocationId()is an internal method for retrieving the corresponding location ID for the provided city. As a design choice, we are performing the network request in a Dispatch Group. This lets us only return only oncefetchJSON()has completed.getCurrentConditions()is a publicly accessible method that the end user will call. This method first executesgetLocationId()to get the corresponding city's location ID and then executes another network request to get the current weather conditions for the location ID. The temperature data provided by MetaWeather is in Celsius, so we'll use an internal convenience helper method calledconvertCelToFar()to convert the temperature to Fahrenheit.
Publishing to GitHub
Sign In to GitHub from Xcode
Conveniently Xcode has GitHub integration, allowing us to both publish and import packages from there. To add your GitHub account to Xcode, select Xcode > Preferences from the menu bar and then select Accounts.
Click the "+" button button in the bottom left corner of the window and select GitHub.
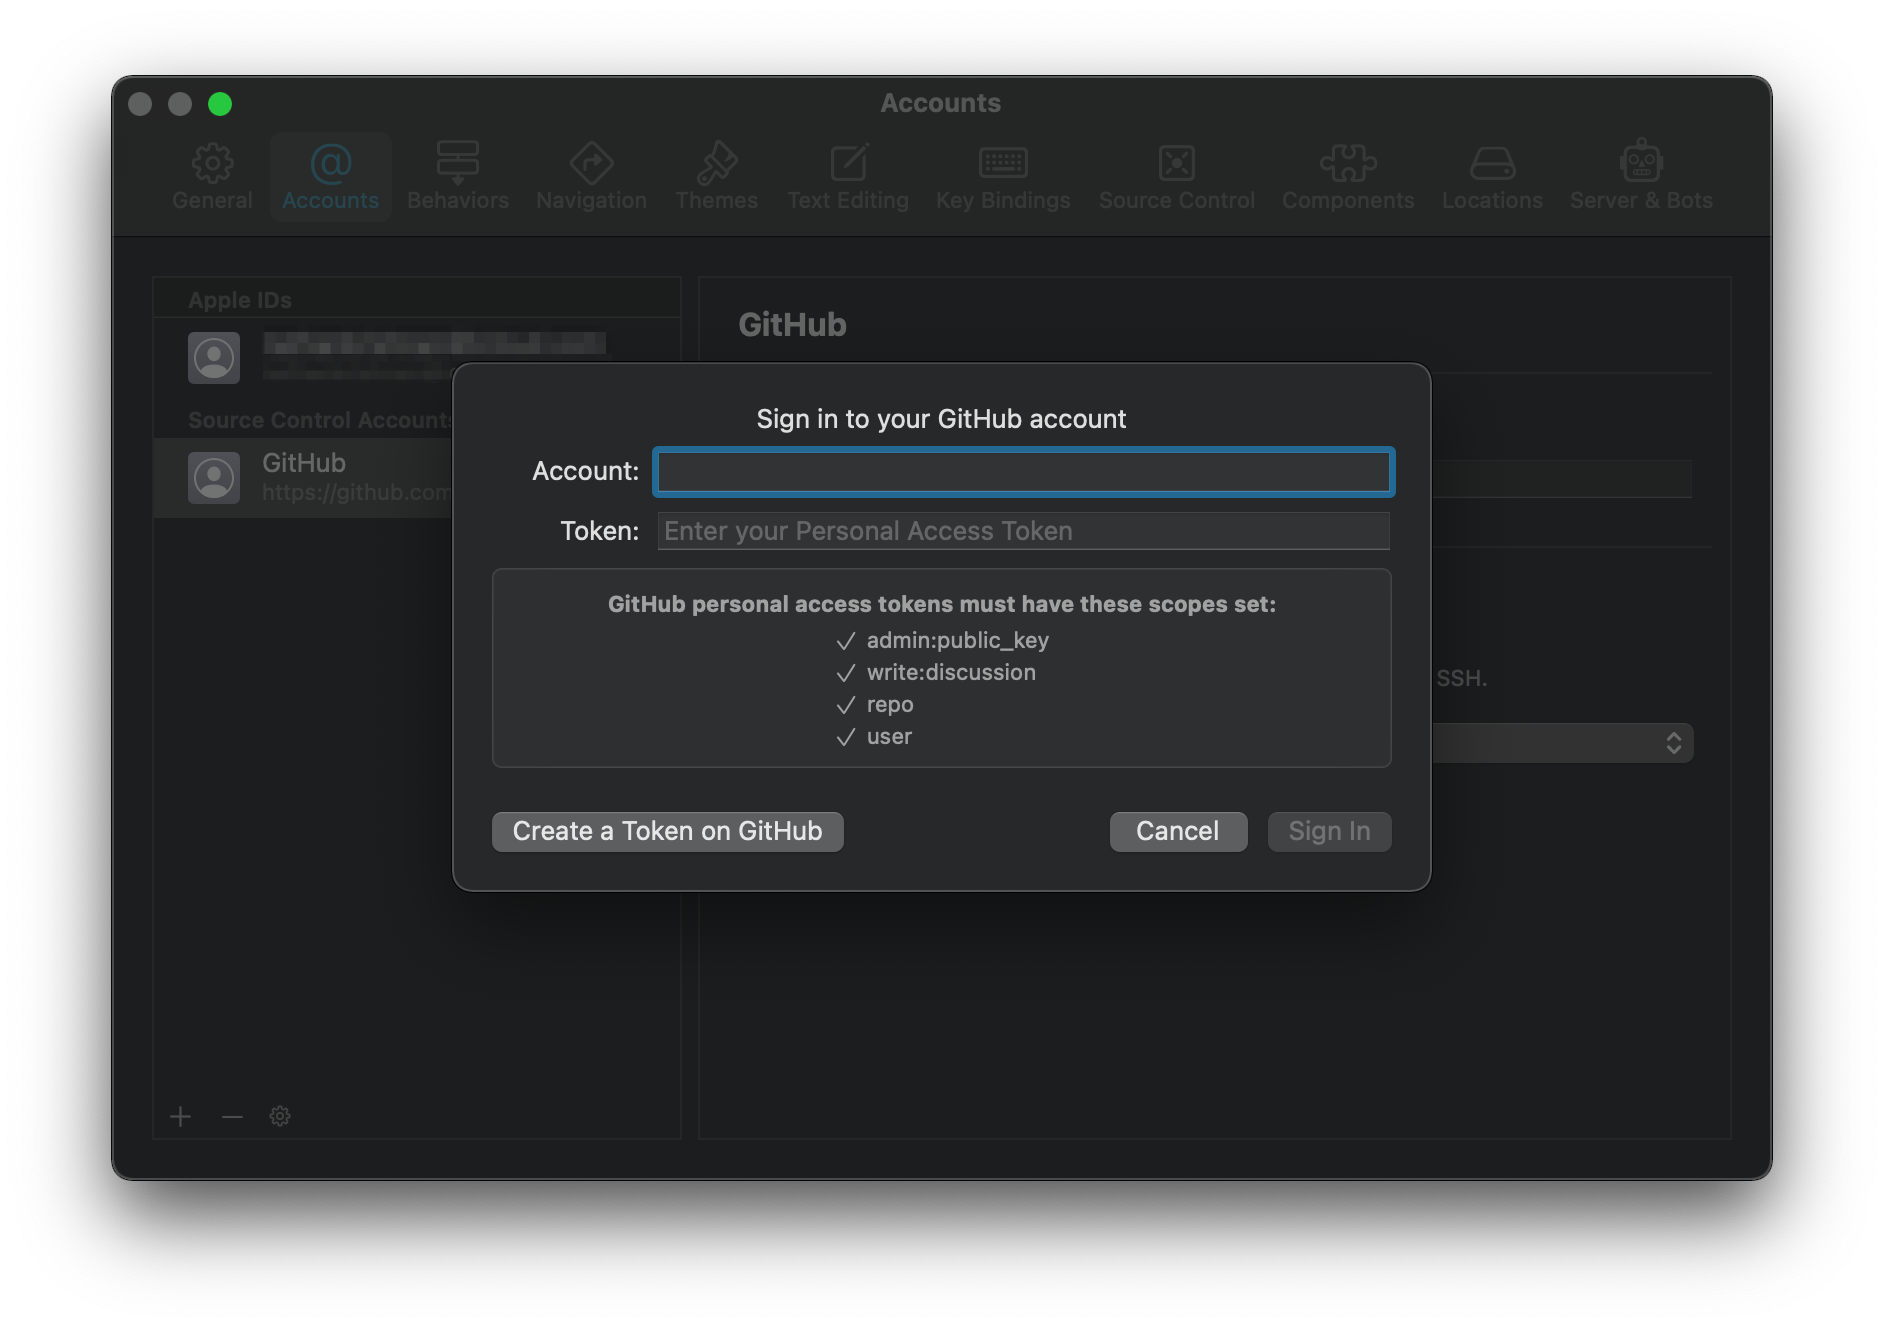
Provide your GitHub account username and an access token, that you can create from your GitHub account. To create an access token, navigate to github.com from your web browser and login. Then navigate your account Settings and select Developer settings. From the Developer Settings, select Personal access tokens. Generate a new token and select the permission scopes that Xcode has recommended.
Create a new Remote Repository
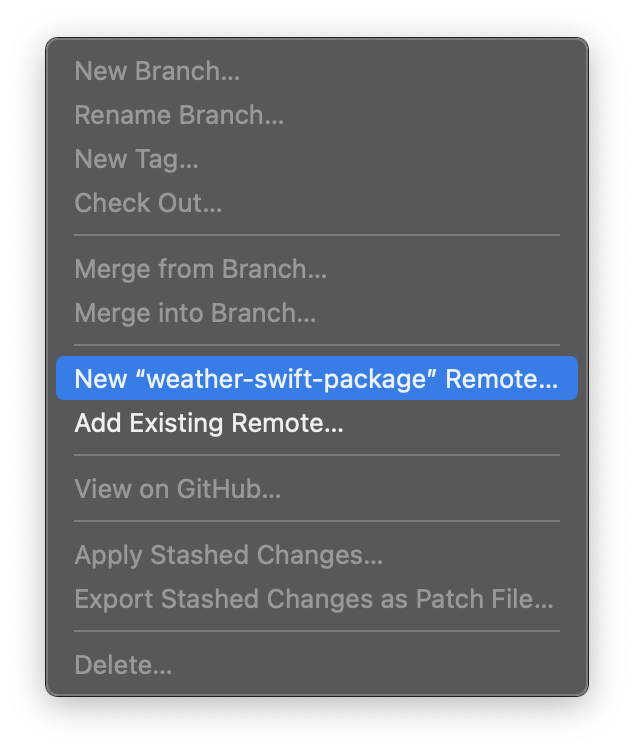
In Xcode, open the Source Control navigator and select Repositories. Right click on Remotes and select New Remote... so that once we're ready to push our code, a new repository on GitHub will be automatically created for us.
Creating a Version Tag
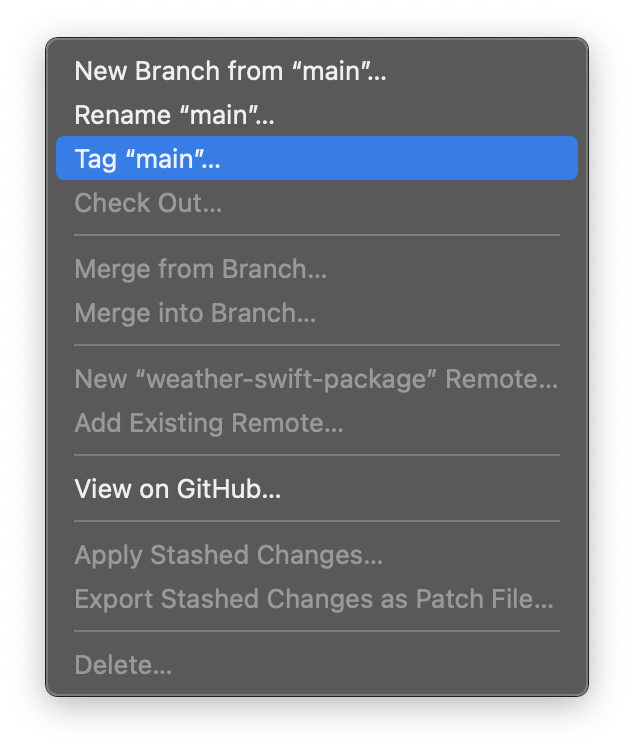
To commit the code, we can select Source Control > Commit from the Xcode menu bar. After you've finished committing the code, right click the main branch and select Tag "main"...
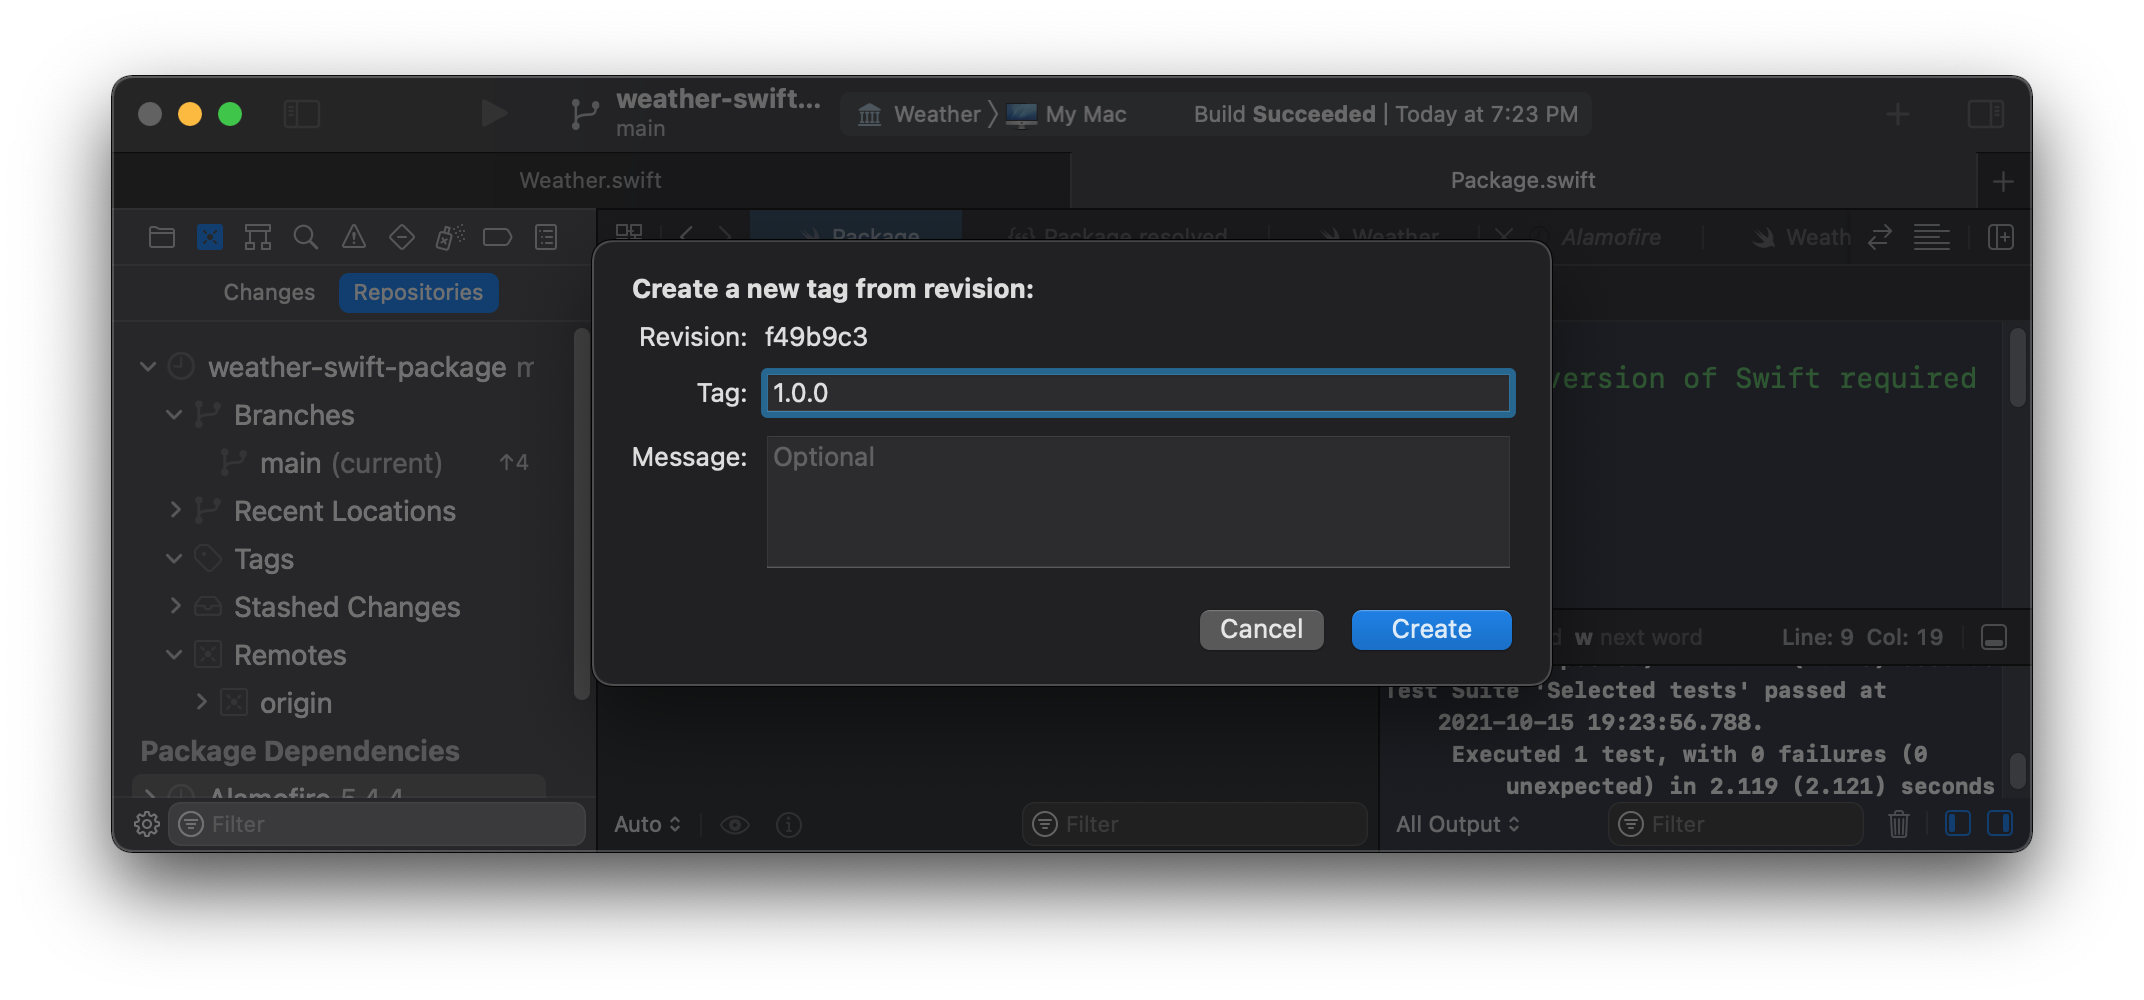
This will bring up a dialog menu for us to create a Tag. Ensure that the revision hash matches the most recent commit. Swift Packages use semantic versioning and a valid package version must be a three period-separated integer. We'll use 1.0.0 for the Tag name.
Pushing to the Remote Repository
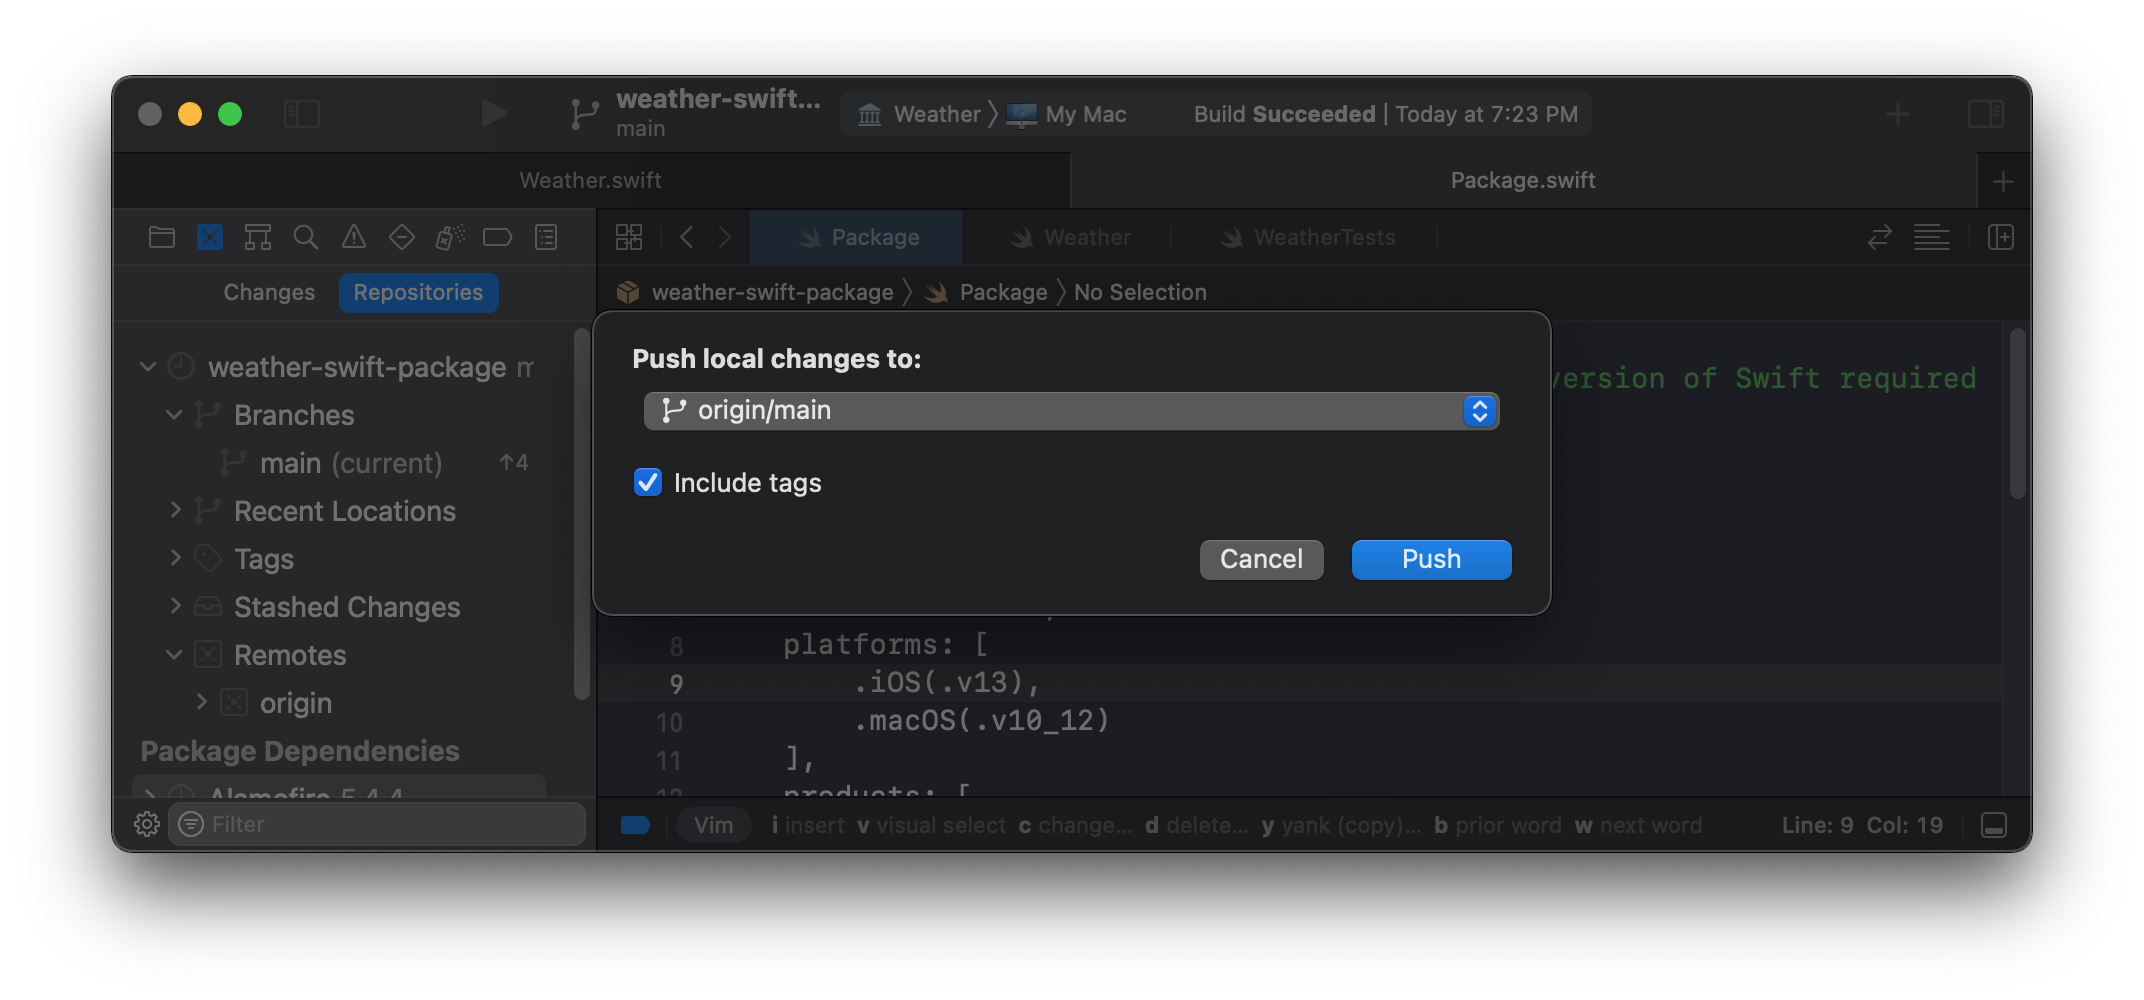
Select Source Control > Push from the Xcode menu bar. Ensure that Include tags is selected and then click Push.
Using a Package in an Xcode Project
From an Xcode Project select File > Add Packages and paste the GitHub repository URL in the search bar. Xcode lets us specify a dependency rule on which version it should fetch. The default of Up to Next Major Version is fine for our purposes. Ensure that the Add to Project has the right target project and then select Add Package.
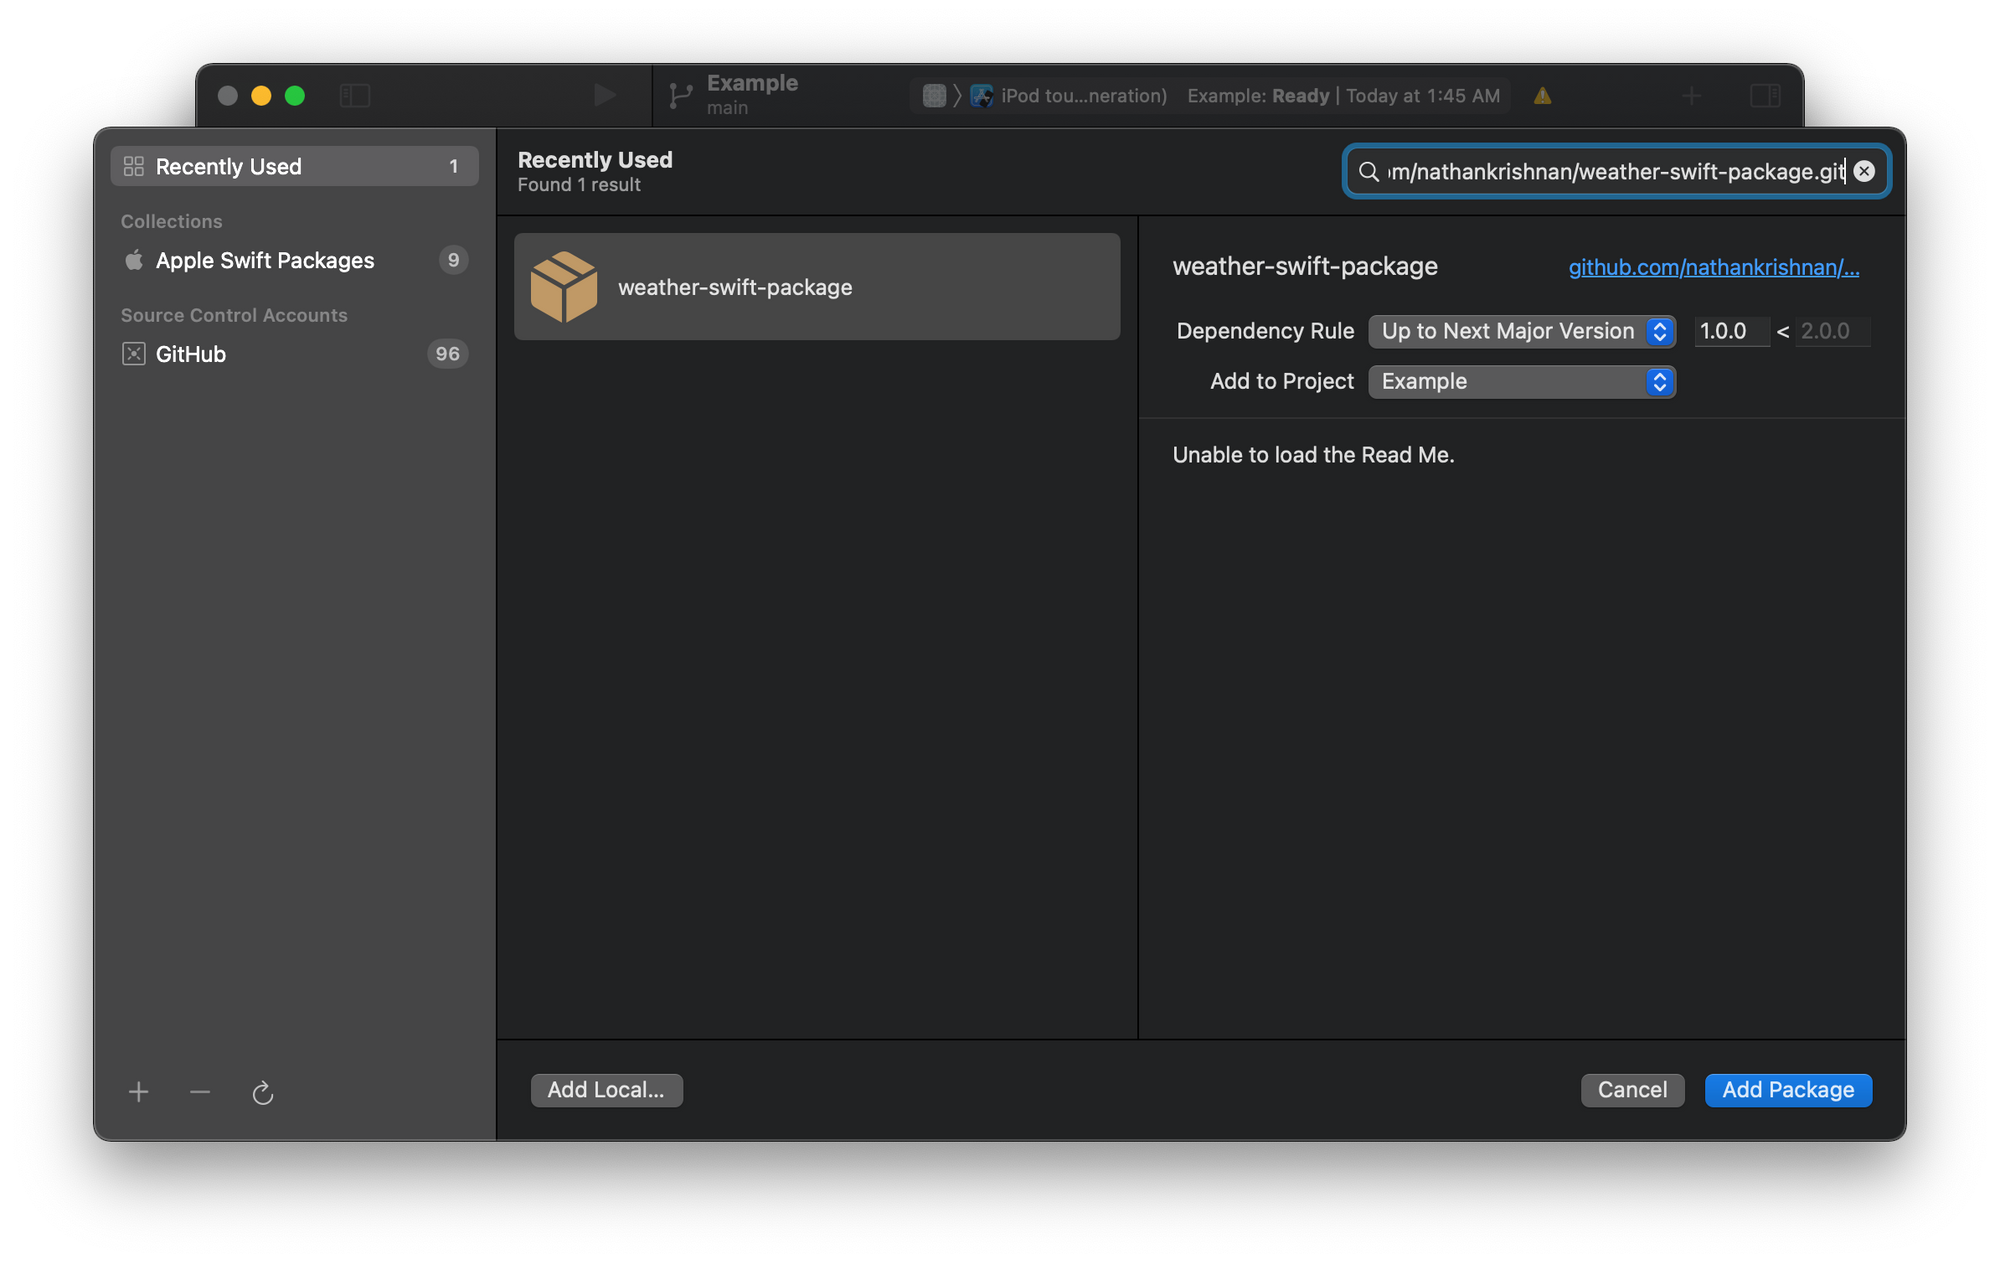
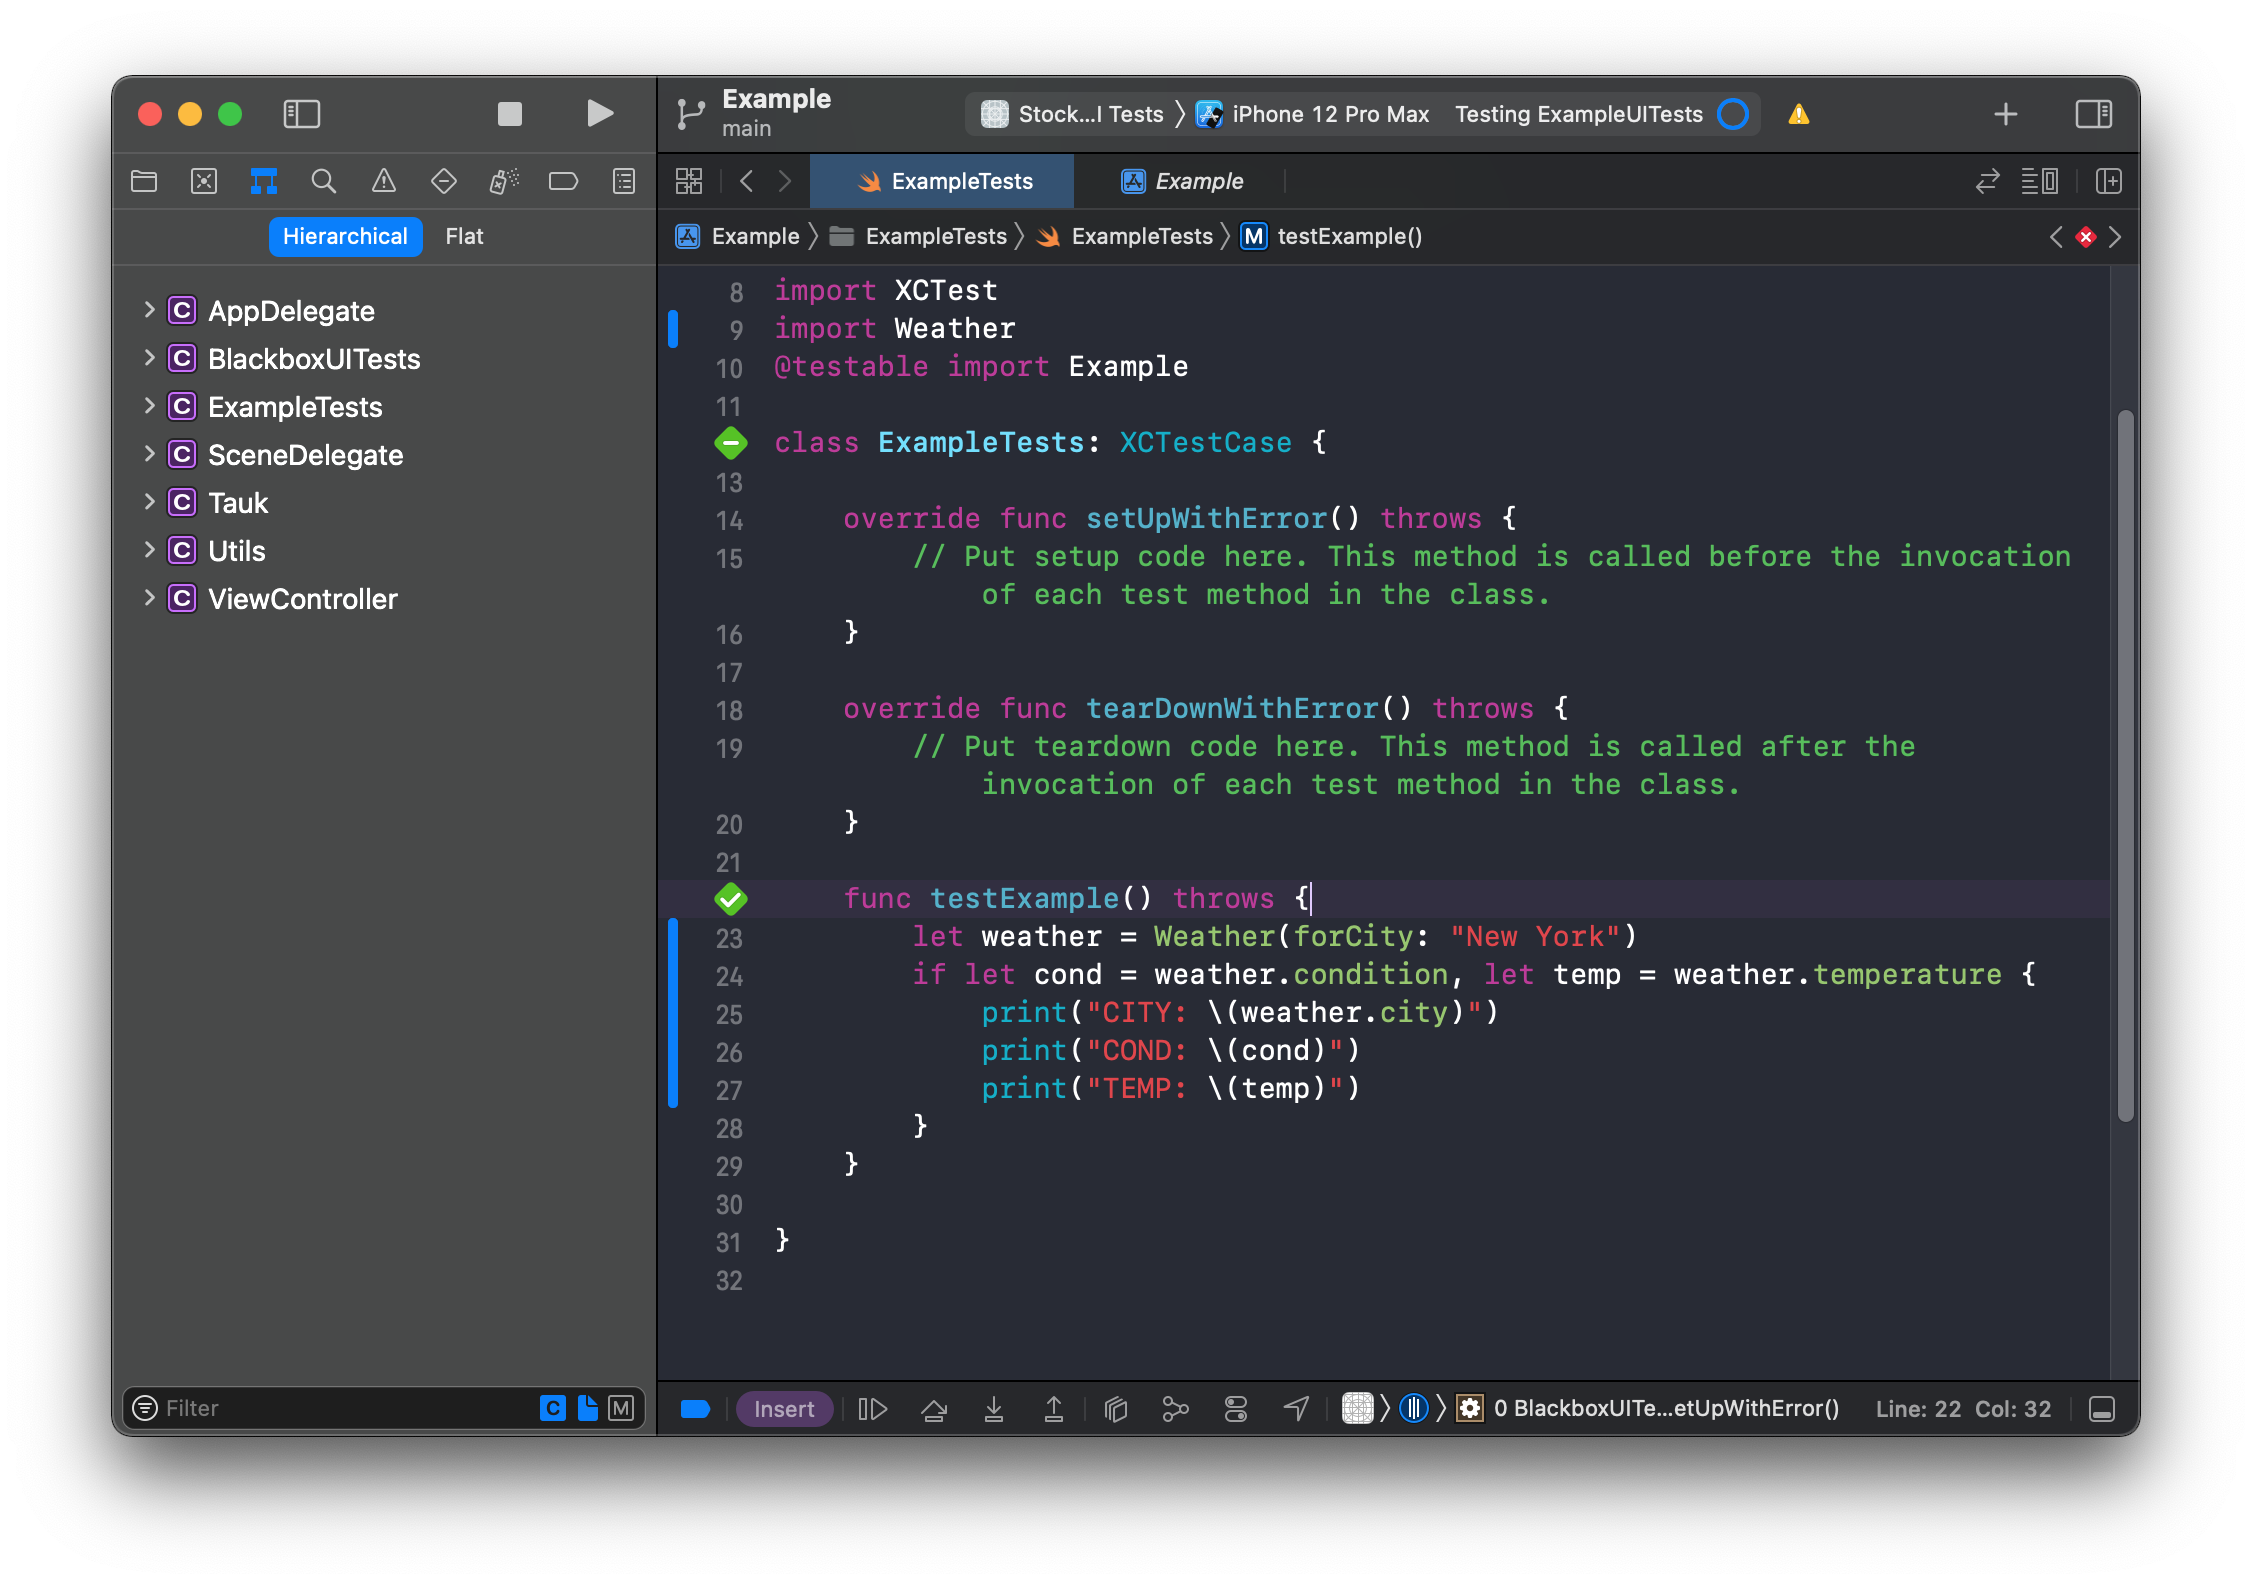
Our package is now added to our project and can be imported and used!
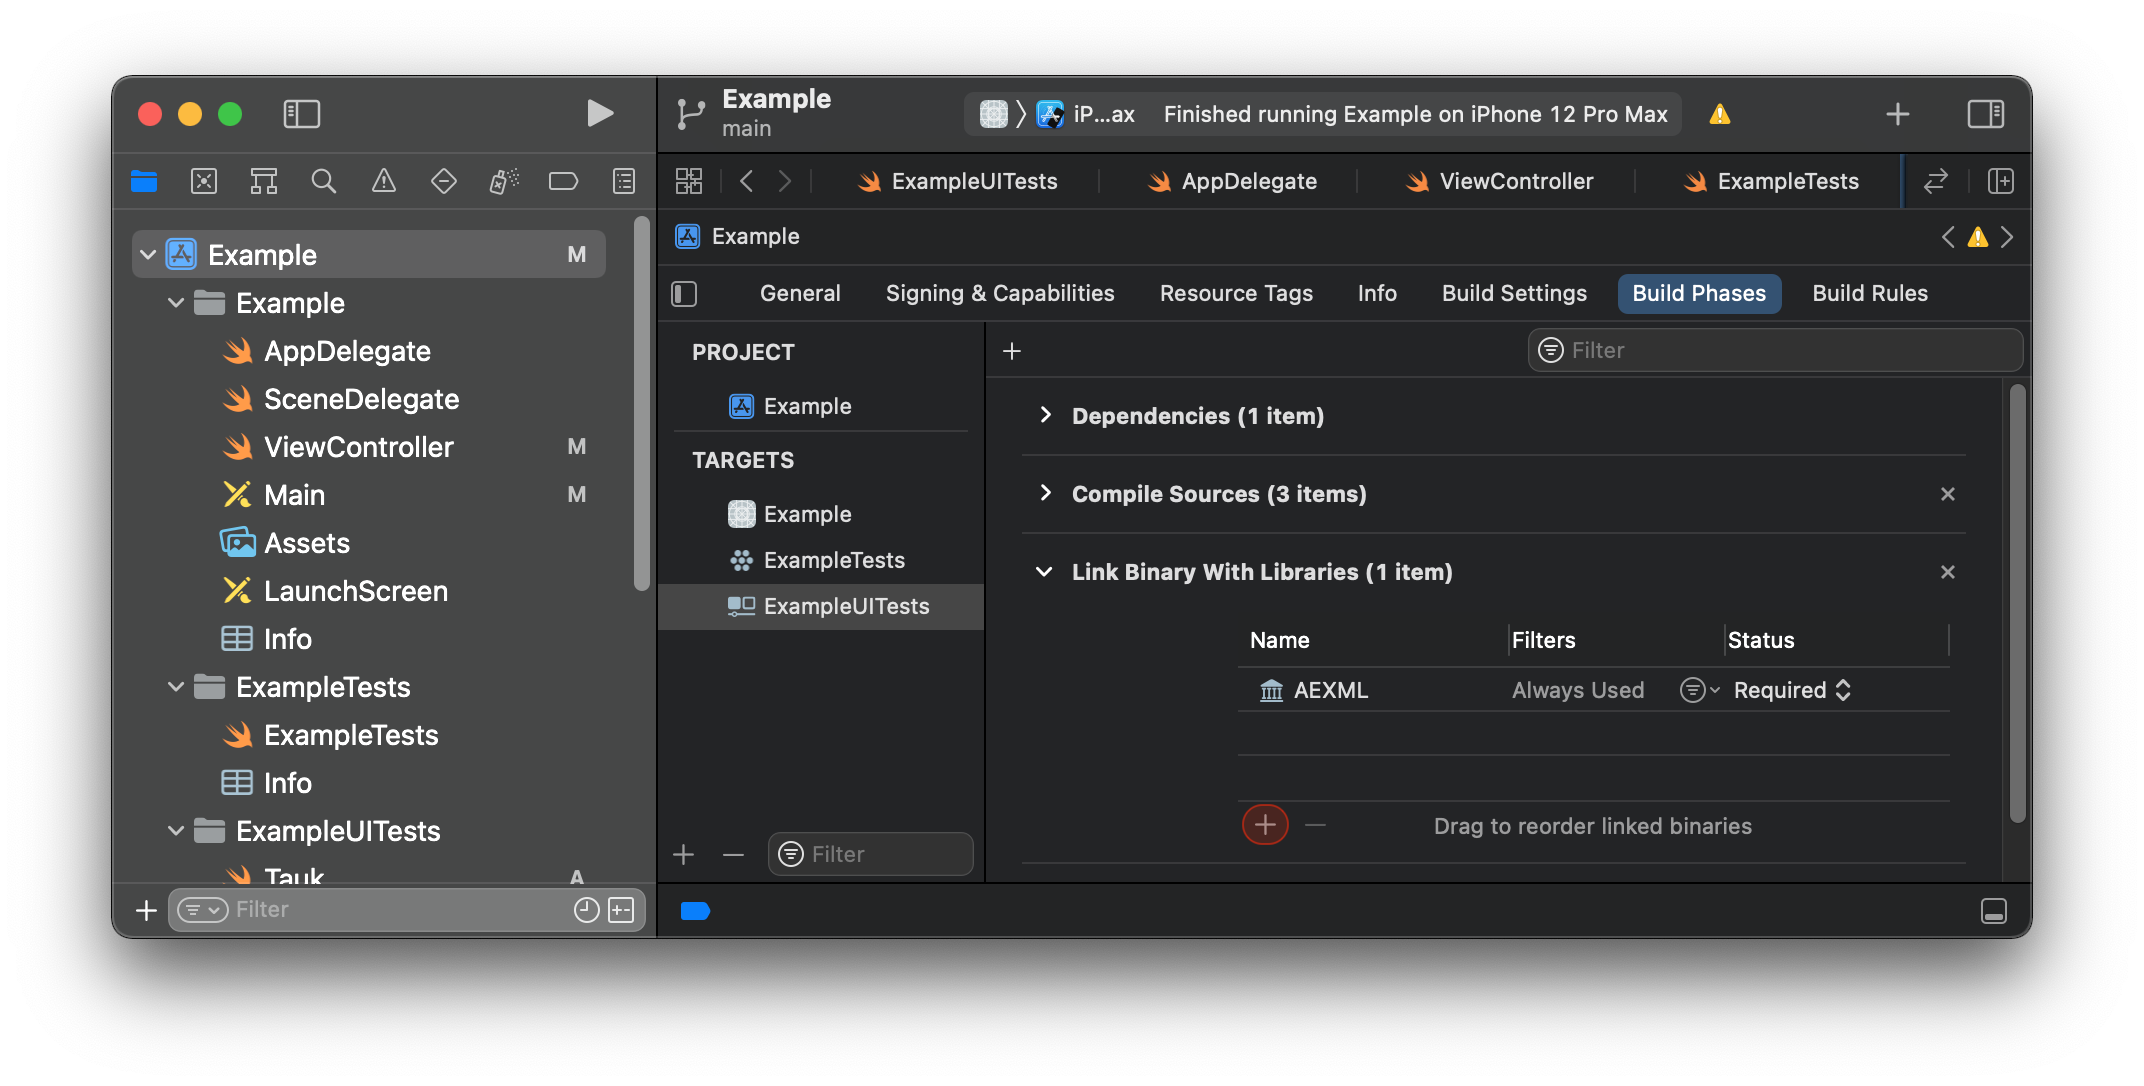
Using a package in a UI Test
By default our package was added to our Project, so we can use it from our app source code or unit tests. Since UI tests are a completely separate target, we will need to link our package to the UI test target before being able to use it within a UI test.
Select your project from the Project navigator and then select your UI tests under the TARGETS area. Select the Build Phases section and from the Link Binary With Libraries section, click on the "+" button.
This will open a dialog menu list and select your package.
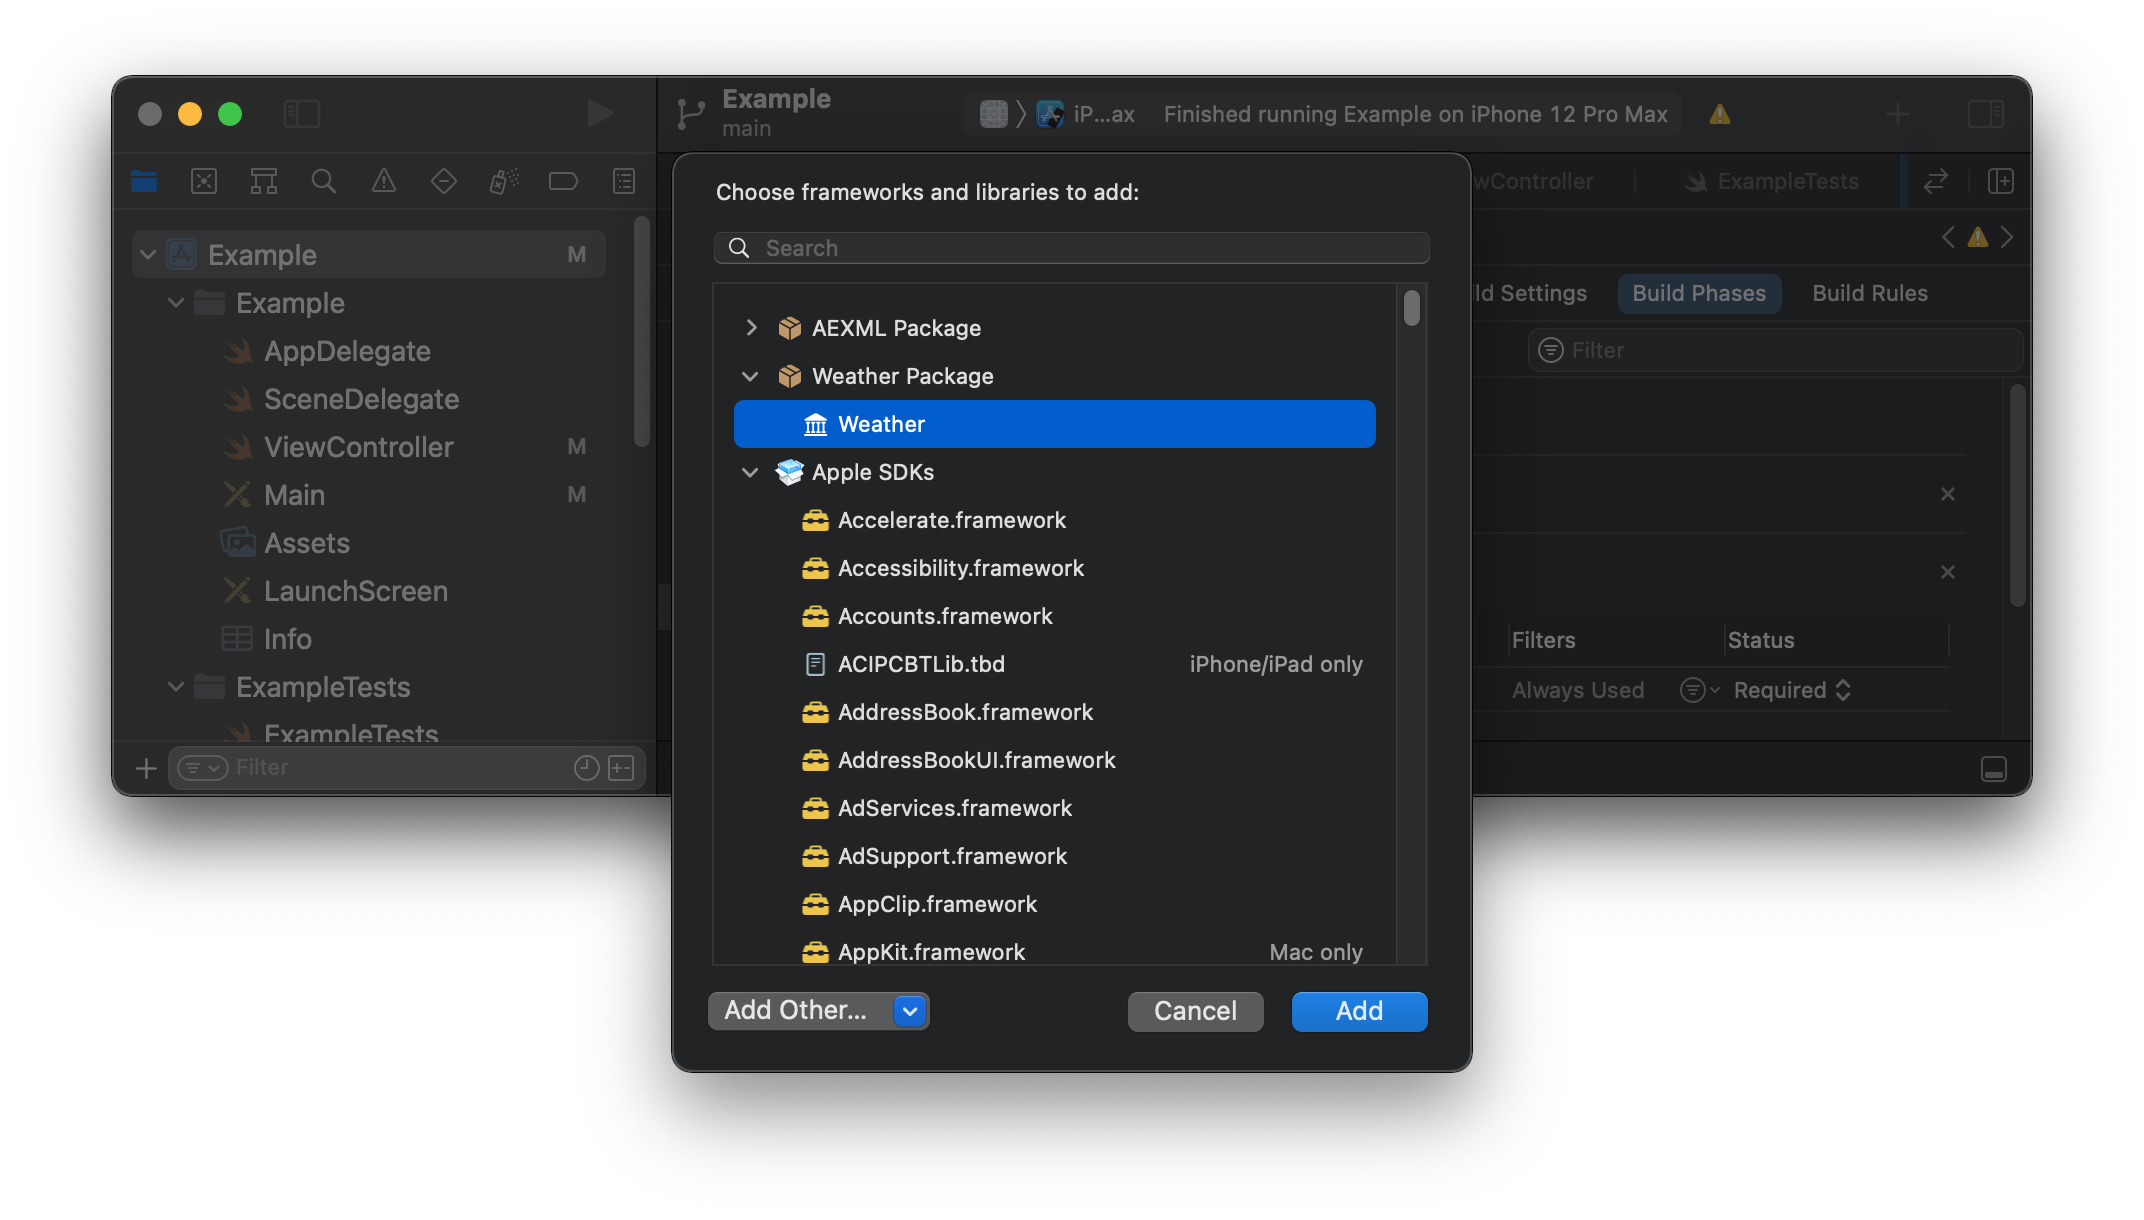
Now that our packaged is linked to our UI test target, we can import and use it within our UI test code.
Member discussion