Part 1: Building and testing native mobile apps with React Native and WebdriverIO

A fundamental challenge with building mobile apps is becoming acquainted with the vast technologies & toolchains in iOS and Android. You have to learn specific languages, IDEs, platform APIs, publishing processes, etc. React Native provides a solution to this dilemma by providing a framework for building cross-platform native mobile apps from one language — JavaScript.
However, after you’ve built your app you face a new challenge: testing end-to-end to ensure there are no functional defects that compromise the user experience. To address this, we can utilize WebdriverIO, which enables us to write automation tests for iOS and Android apps also from one language — JavaScript.
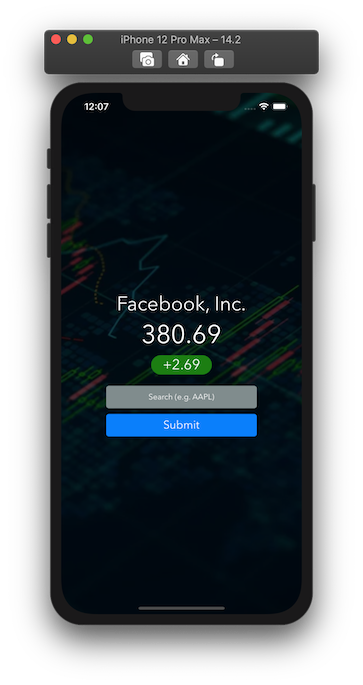
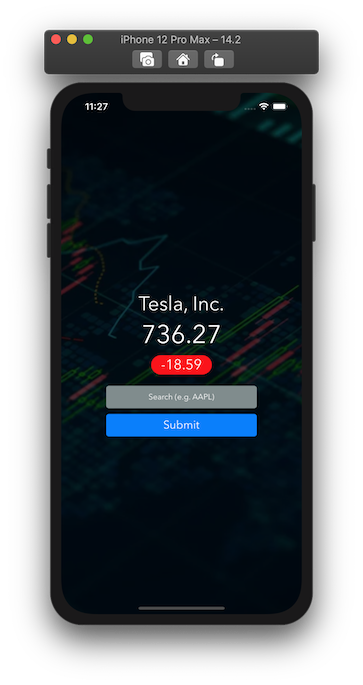
The combination of using React Native and WebdriverIO allows us to build and test cross-platform native mobile apps exclusively in JavaScript. In this three-part series we will build an app to check stock prices, refactor it to make it automation friendly, and then write automation tests for it. Once you’ve completed the series, you’ll have an app that runs on iOS and Android with tests to confirm that the functionality works as expected. Here’s a screenshot of what our app will look like once you’ve completed Part 1:
You can find the full source code for this React Native project here:
 nathankrishnan
Contents of this Guide
● Prerequisites
- Xcode and Android Studio
- Node.js
- Yarn
- Watchman (for macOS users)
- Expo CLI
● App.js
● JSX in a nutshell
● More on props
● Building our App
- Layout and Styling
- Creating a Search Bar Component
- Fetching Stock Price Data
- Creating a Stock View Component
- Refactoring App.js
Prerequisites
Xcode and Android Studio
Having both installed allows us to test on the iOS Simulator and Android Emulator.
Node.js
Node.js is a JavaScript runtime environment. You can download the pre-built installer of the Node.js LTS release for your OS from the official website:
Note: For macOS users that have an M1 mac, you can alternatively use Node.js 16.X since this version has Apple Silicon support.
Yarn
Yarn is a JavaScript package manager created by Facebook and it is an alternative to the npm client. After you’ve installed Node.js in the previous step, you can run the following command to install yarn:
$ npm install --global yarn@1.22.11Note: 1.22.11 is the current version of Yarn 1 (Classic) at the time of this blog post.
Watchman (for macOS users)
Watchman is a tool created by Facebook for watching files in a given project directory and triggering actions when they change. You can install it via Homebrew:
$ brew install watchmanExpo CLI
Expo CLI is a command line tool that helps scaffold React Native projects and provides the easiest way to get started. It also has a companion Expo client app that you can install on iOS and Android devices that allows you to preview your apps wirelessly. We can install it via yarn:
$ yarn global add expo-cli@4.11.0Note: 4.11.0 is the current version of the Expo CLI at the time of this blog post. Also for those more familiar with npm the command above is the yarn equivalent of npm install --global expo-cli@4.11.0
With the Expo CLI installed we can initialize our project setup:
$ expo init react-native-stock-price-app --template blank@sdk-42 --yarnWe’re using the --template flag to specify we want to setup a project with a blank template that's built with the Expo SDK version 42, which is the latest at the time of this blog post. We also pass the --yarn flag to have the project use yarn as the package manager instead of npm.
Once the command finishes, there will be a new project directory created with the name react-native-stock-price-app. Navigate to this directory:
$ cd react-native-stock-price-app/
The Expo CLI has conveniently scaffolded our project. If you run ls in your terminal this is what you'll see in the project directory:
.
├── .expo-shared
├── .git
├── .gitignore
├── App.js
├── app.json
├── assets
├── babel.config.js
├── node_modules
├── package.json
└── yarn.lock
Here’s a quick overview of what these files and directories are:
.expo-shared/- contains configuration files for the Expo project. You won't have to interface with these, it's for the Expo CLI to utilize..git- Expo has conveniently setup git version control for us in our project..gitignore- Likewise Expo has conveniently setup what files to ignore in version control.App.js- This is where our application code lives.app.json- A json configuration file that allows us to add information about our Expo app. The list of available configuration options can be found in the official documentation.assets/- A directory that contains a few image assets by default. We get a default app icon and splash screen image.babel.config.js- A configuration file that allows us to define presets and plugins for configuring Babel. Babel is a transpiler for backwards compatibility across JavaScript environment versions.node_modules/- Directory that contains all packages we use in our project. Any new dependencies we install will be located here.package.json- The project information for our package manager. Expo has conveniently setup script commands we can run that we'll use later.yarn.lock- When we install a dependency, yarn creates an entry in this file that maps the dependency name, version, and where it was installed.
As a quick test, run the following command from the project directory:
$ expo startThis will open a tab in your browser and load the Expo Developer Tool interface:
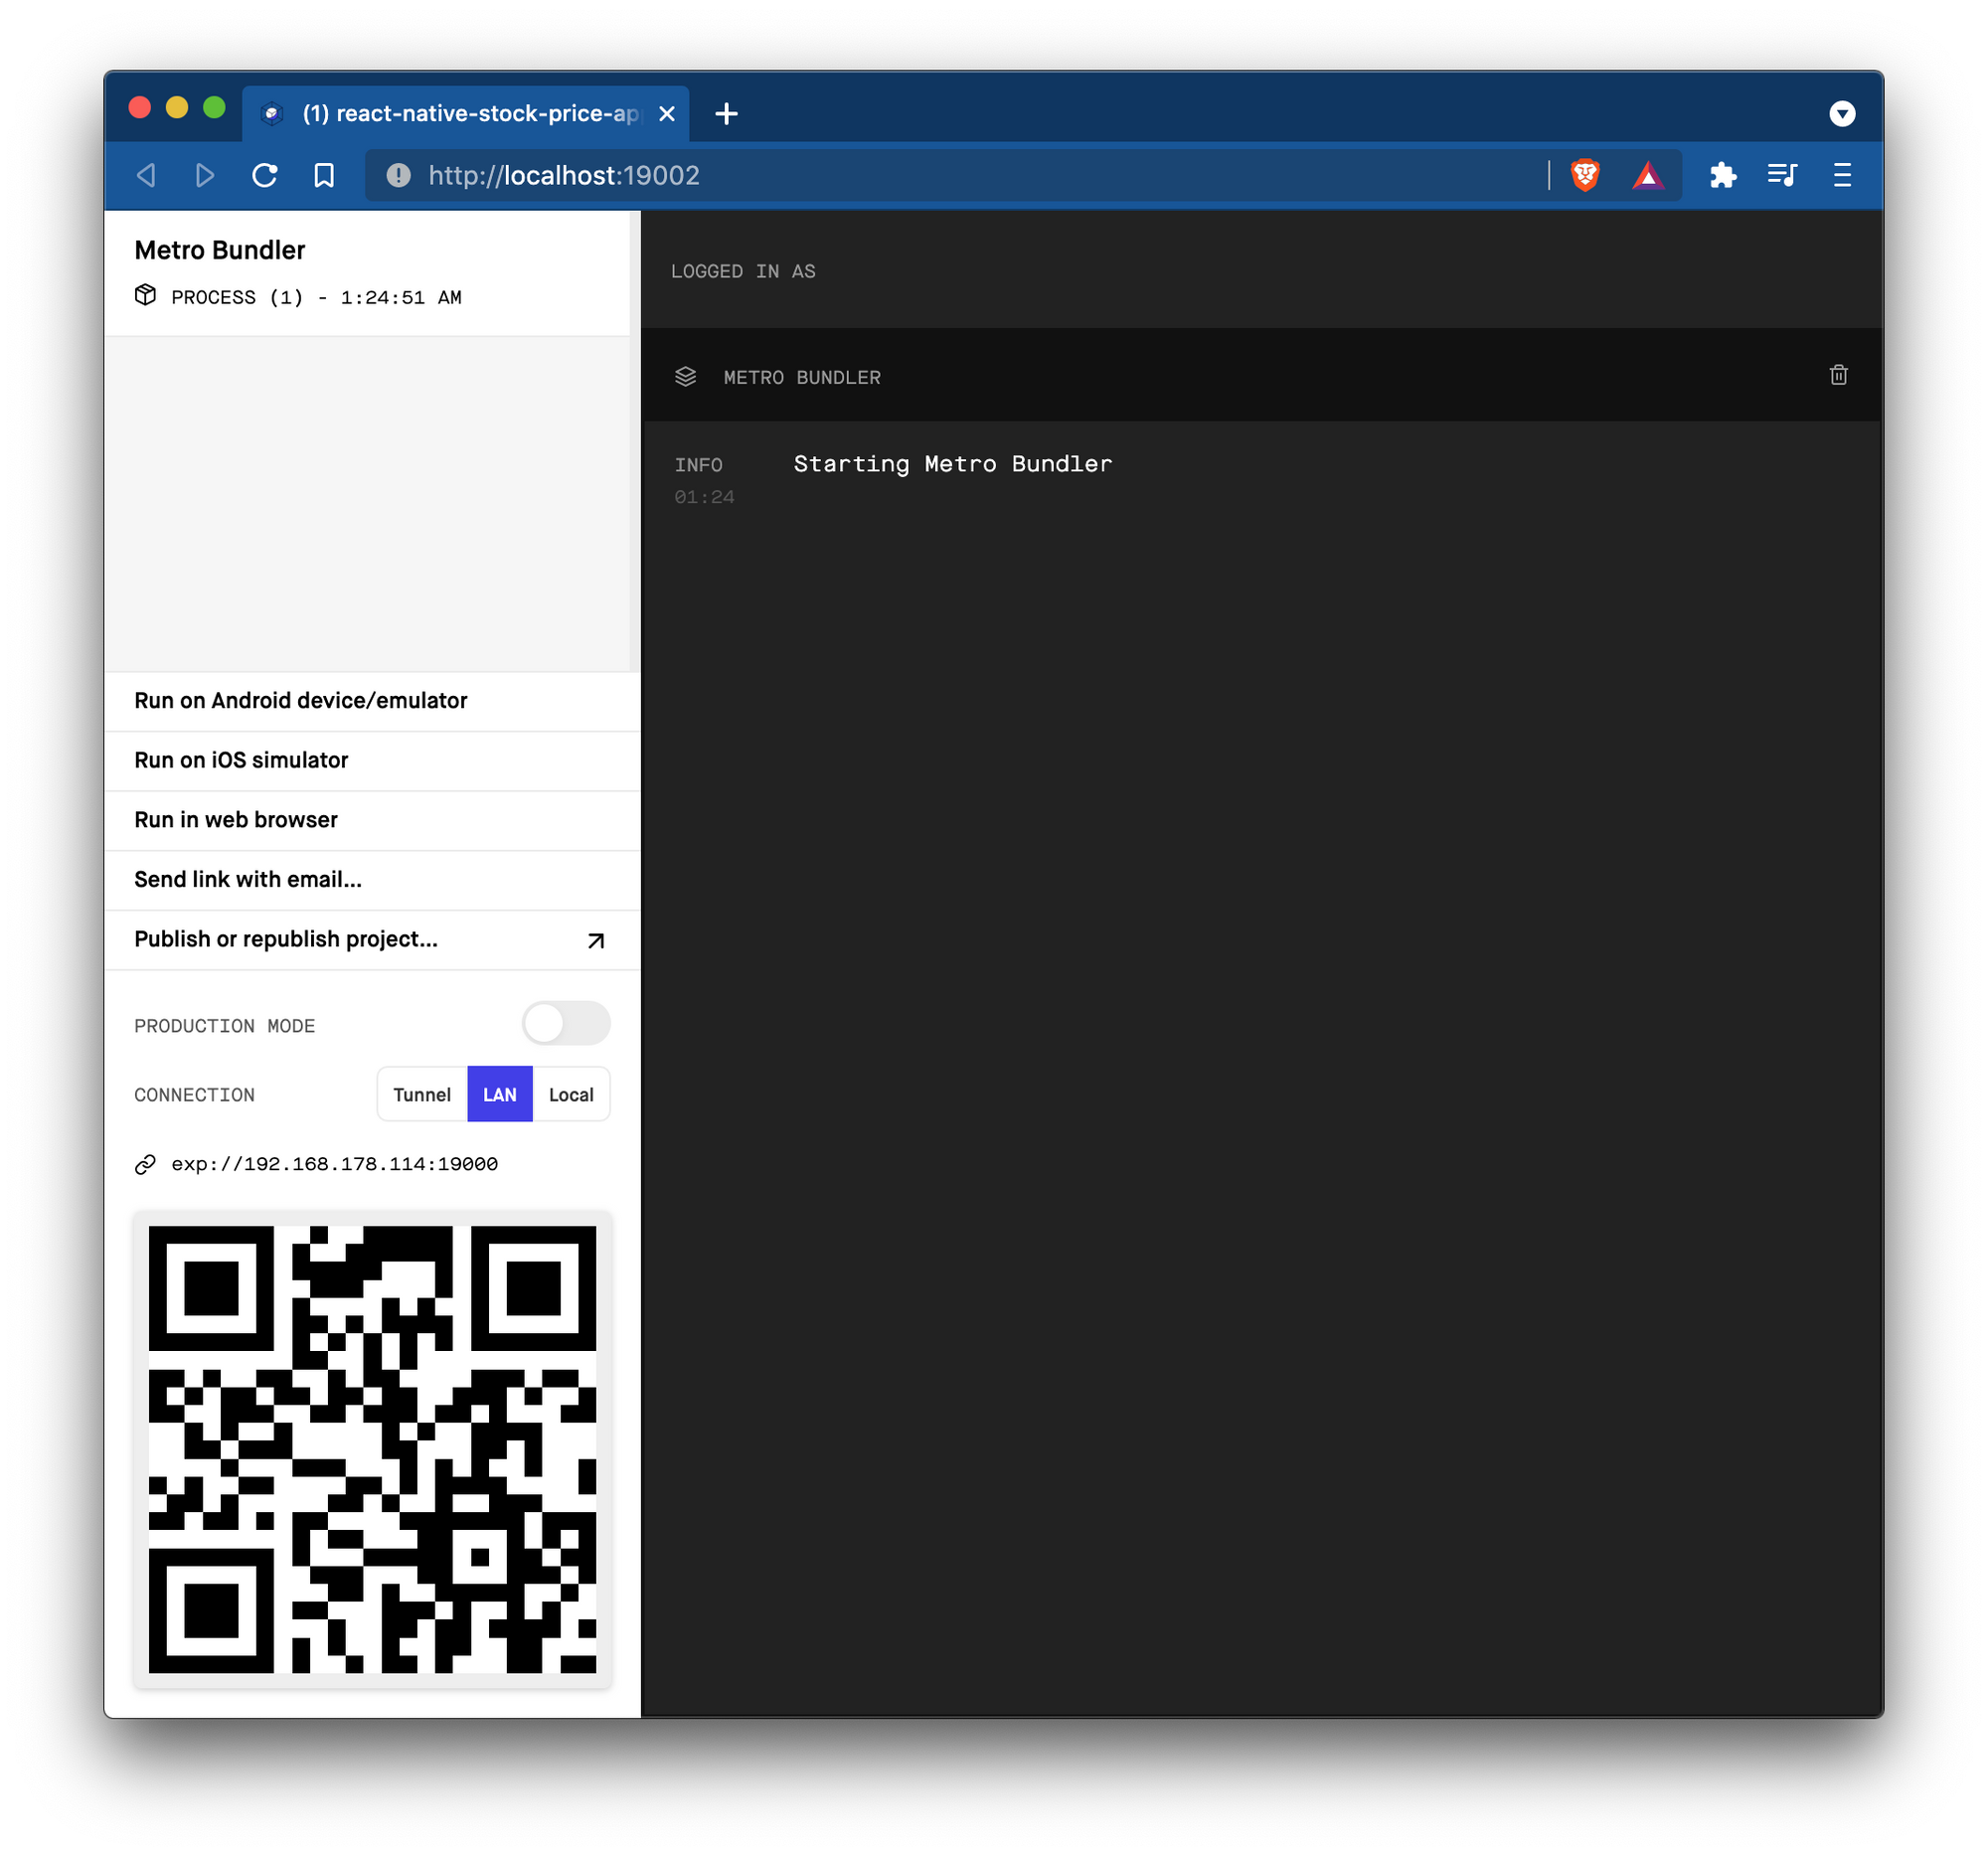
The interface gives us a central place to view logs and also shortcuts to actions like running our app on an iOS Simulator or Android Emulator. You can also test on a real device wirelessly by downloading the Expo client app from the iOS App Store or Google Play store and then scanning the QR code. This is the default view Expo has created for us in our app:
App.js
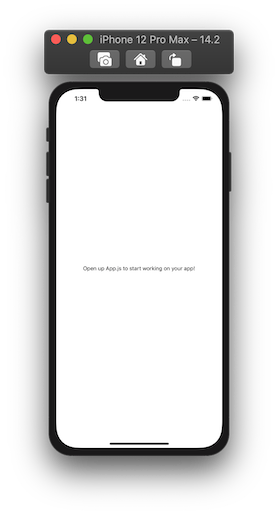
Amongst the project files the Expo CLI has scaffolded for us, there is an App.js file. If you open it this what you'll see:
// Imports
import { StatusBar } from 'expo-status-bar';
import React from 'react';
import { StyleSheet, Text, View } from 'react-native';

// Our App Component
export default function App() {
  return (
    <View style={styles.container}>
      <Text>Open up App.js to start working on your app!</Text>
      <StatusBar style="auto" />
    </View>
  );
}

// Our Stylesheet
const styles = StyleSheet.create({
  container: {
    flex: 1,
    backgroundColor: '#fff',
    alignItems: 'center',
    justifyContent: 'center',
  },
});
In this file we have a function named App(). In React Native there is a concept called components, which are used to encapsulate elements and behavior for reuse across your app. There are two kinds of components in React Native: functional components and class components. The difference in a nutshell is that functional components cannot have their own state, while class components can. We'll come back to this concept momentarily, but first let's summarize what has been created for us in the file:
- Our entire App is a single custom component that returns a
Viewcomponent, that also includes aTextandStatusBarcomponent nested in it. Even though theApp()function was autogenerated for us, it's actually a custom component. However,View,Text, andStatusBarare built-in components in the React Native standard library. - The markup syntax is called JSX. It’s a way for us to express the components in a HTML-like fashion. e.g.
Viewis the parent and hasTextandStatusBarelements as children. That said, it's actually syntactic sugar for the JavaScript function calls that React Native will make behind the scenes. - The
Viewcomponent is essentially a layout container in our app. For those with a web development background, it's essentially being used like a<div>in this example. WithinViewis aTextcomponent that renders a text string. There's also aStatusBarcomponent that configures the status bar at the top of the screen. In contrast toText, theStatusBarcomponent doesn't render anything on the screen, but configures an existing part of the mobile OS UI.
For the app we’re building, having state matters since we will be accepting text input. So let’s go ahead and change our functional component to a class component:
export default class App extends React.Component {
  render() {
    return (
      <View style={styles.container}>
        <Text>Open up App.js to start working on your app!</Text>
        <StatusBar style="auto" />
      </View>
    );
  }
}
JSX in a nutshell
JSX is a JavaScript markup syntax used in React Native that makes it easier for us to express components. Behind the scenes it gets compiled to regular JavaScript function calls using the React.createElement() function.
Here’s a simple example to illustrate:
<Text>Hello World!</Text>This would get compiled to:
React.createElement(
  "Text", // 1. The Element Type
  null, // 2. Props
  "Hello World!" // 3. Children
);- The first parameter is the type of element we want to create. In this case a
Textelement. - The second parameter is the
propsof the element. We'll talk more aboutpropsmomentarily, but they're usually references to event handlers or styling objects you pass in. However, in this particular example we aren't passing any in. - The third parameter are the child elements, in this case a string.
More on props
props allow us to pass parameters to components so we can customize them. As we'll see later, we can pass things such as styles, event handlers, and configuration values. They're akin to parameters you could pass in a JavaScript function. Depending on the component you're using, some props are required or optional.
For example, the View component accepts a style prop. The style prop accepts a StyleSheet object, which is like the JSON representation of a CSS file. When working with the built-in components that React Native provides, you can take a look at the official Core Components docs to understand what props they accept.
React Native uses flexbox for layout and aligning elements. Although we won’t go into depth on styling components in this blog post, you can take a look at the official React Native Design docs section to get an overview.
As quick learning experiment, go ahead and change the Text color to blue and increase the font size by providing it a style prop:
export default class App extends React.Component {
  render() {
    return (
      <View style={styles.container}>
        <Text style={styles.mainText}>Open up App.js to start working on your app!</Text>
        <StatusBar style="auto" />
      </View>
    );
  }
}

const styles = StyleSheet.create({
  container: {
    flex: 1,
    backgroundColor: '#fff',
    alignItems: 'center',
    justifyContent: 'center',
  },
  mainText: {
    color: 'blue',
    fontSize: 20,
  },
});
We can also pass in multiple styles into the style prop by passing in an array of StyleSheet objects. For example, this would look like:
<Text style={[styles.mediumText, styles.textStyle]}>Tesla, Inc</Text>When we do this, the styles at the end of the array will take precedence over the ones before them. We’ll do this in the next section when we scaffold our app’s user interface.
Building our App
Layout and Styling
We will now start to scaffold the layout with mock values. Update your App.js file with the contents below and I'll summarize the changes momentarily:
import React from 'react';
import { ImageBackground, StyleSheet, Text, View, StatusBar} from 'react-native';

export default class App extends React.Component {
  render() {
    return (
      <View style={styles.container}>
        <StatusBar barStyle="light-content" />
        <ImageBackground
          source={require('./assets/background.png')}
          style={styles.imageContainer}
          imageStyle={styles.image}
        >
          <View style={styles.detailsContainer}>
            <Text style={[styles.mediumText, styles.textStyle]}>Tesla, Inc</Text>
            <Text style={[styles.largeText, styles.textStyle]}>754.86</Text>
            <View style={styles.rectangleShapeContainer}>
              <Text style={[styles.smallText, styles.textStyle]}>+0.98</Text>
            </View>
          </View>
        </ImageBackground>
      </View>
    );
  }
}

const styles = StyleSheet.create({
  container: {
    flex: 1,
    backgroundColor: 'black',
  },
  textStyle: {
    fontFamily: 'AvenirNext-Regular',
    textAlign: 'center',
    color: 'white',
  },
  largeText: {
    fontSize: 45,
  },
  mediumText: {
    fontSize: 35,
  },
  smallText: {
    fontSize: 25,
  },
  rectangleShapeContainer: {
    marginTop: 5,
    marginHorizontal: 160,
    borderRadius: 20,
    justifyContent: 'center',
    backgroundColor: 'green',
  },
  imageContainer: {
    flex: 1,
  },
  image: {
    flex: 1,
    width: null,
    height: null,
    resizeMode: 'cover',
  },
  detailsContainer: {
    flex: 1,
    justifyContent: 'center',
  }
});
Note: You can get the background.png image asset from the GitHub repo of this project.
React Native lets us nest components within other components, helping us compose a desired user interface. In this example, we currently have a main View component that has a StatusBar and ImageBackground as child components. Here's a summary of our current view hierarchy:
<View>
├── <StatusBar>
└── <ImageBackground>
    └── <View>
        ├── <Text>
        ├── <Text>
        └── <View>
            └── <Text>
With these newly added changes, this is what our app currently looks like:

In the subsequent sections, we’ll take a progressive approach and first create a custom SearchBar component. Then we'll embed the SearchBar in another custom view called StockView that will allow users to enter in a stock ticker name and display the results. Lastly we'll add the components to our App.js.
Creating a Search Bar Component
In our app we’ll need a way for our users to enter a stock ticker symbol, so that we can fetch the current price values. To accomplish this, we can create a custom component that will comprise of TextInput and Button components.
In our project directory, create a new subdirectory called components. Within it create a file called SearchBar.js. In this file we'll create a class component called SearchBar. The reason we need to make SearchBar a class component, opposed to a functional component, is because we'll need to access to the text being entered before we can send it off to a function to fetch the stock price.
Update your SearchBar.js to look like what I've added below and I'll summarize momentarily:
import React from 'react';
import { StyleSheet, TextInput, Text, TouchableOpacity, View } from 'react-native';

export default class SearchBar extends React.Component {
	// Initialize our SearchBar's state to empty text
	constructor(props) {
		// We have to first call the parent's constructor
		// The parent here is React.Component
		super(props);
		this.state = {
			textValue: '',
		};
	}

	handleChangeText = (newStockSymbolTextValue) => {
		// Update the textValue in the component's state
		this.setState({
			textValue: newStockSymbolTextValue
		});
	}

	handleSubmitEditing = () => {
		// Get a reference to the function onSubmit from the props passed in
		const { onSubmit } = this.props;

		// Get the textValue from the component's state
		const { textValue } = this.state;

		if (textValue.length > 0) {
			// Run the onSubmit function with the textValue as input
			onSubmit(textValue);

			// Clear the textValue from the component's state
			this.setState({
				textValue: '',
			});
		} else {
			return;
		}
	}

	render() {
		const { placeholderTextInputLabelText } = this.props;
		const { textValue } = this.state;

		return (
			<View>
				<View style={styles.container}>
					<TextInput
						style={styles.textInput}
						value={textValue}
						placeholder={placeholderTextInputLabelText}
						placeholderTextColor="white"
						underlineColorAndroid="transparent"
						clearButtonMode="always"
						autoCorrect={false}
						onChangeText={this.handleChangeText}
						onSubmitEditing={this.handleSubmitEditing}
					/>
				</View>
				<TouchableOpacity
          style={styles.submitButton}
          onPress={this.handleSubmitEditing}
      	>
					<Text style={[styles.buttonText, styles.textStyle]}>Submit</Text>
				</TouchableOpacity>
			</View>
		);
	}
}

const styles = StyleSheet.create({
	container: {
		height: 40,
		marginTop: 20,
		backgroundColor: '#7F8C8D',
		marginHorizontal: 80,
		paddingHorizontal: 10,
		borderRadius: 5,
	},
	textInput: {
		flex: 1,
		color: 'white',
		textAlign: 'center',
		fontFamily: 'AvenirNext-Regular',
	},
	submitButton: {
		height: 40,
		marginTop: 10,
		backgroundColor: '#007AFF',
		marginHorizontal: 80,
		paddingHorizontal: 10,
		borderRadius: 5,
		justifyContent: 'center'
	},
	textStyle: {
		fontFamily: 'AvenirNext-Regular',
		textAlign: 'center',
		color: 'white',
	},
	buttonText: {
		fontSize: 20,
	}
});- Because we need to handle the text input being sent to our class component, we can initialize local state in the
constructor()method of theSearchBar. In ourSearchBarclass component, we have access to an object calledstate. Class components in React Native will have a localstateobject you can modify. Just like how we can access a class component's props withthis.props, we can access the component's local state withthis.state. Whilepropsare readonly and owned by the component's parent,stateis editable and owned by the component itself. In this case we're setting a property calledtextValueto an empty string. We'll usetextValueto store the incoming text input we receive. TextInputhas twopropsfor we can use for handling behavior:onChangeTextandonSubmitEditing. Both of thesepropsaccept callback functions. In the case foronChangeTextthe callback we pass to it will be called when theTextInput's text is being modified.onSubmitEditingaccepts a callback that will be executed when theTextInput's content is submitted, which occurs when the user presses the enter key on their virtual keyboard after entering text. We've created two callback functions as input to theseprops:handleChangeTextandhandleSubmitEditing. In the case forhandleSubmitEditingthe novel insight is that we receive a callback function from the parent component, passed down in theprops, that we can send the text input to.- In our
render()function, you'll see that we have aTouchableOpacitycomponent that we're using as a button. You may be wondering why we're not using the React NativeButtoncomponent instead. The answer in this case is for stylistic reasons, styling aTouchableOpacitycomponent is much more flexible than a standardButton. TheTouchableOpacitycomponent also has a prop calledonPressfor handling behavior when the component is tapped by the user. We'll provide it the same callback function that we've provided to theTextInput'sonSubmitEditingprop. This way from a user experience standpoint, a user can submit their stock price symbol text either by pressing "enter" on their virtual keyboard or tapping our button.
Fetching Stock Price Data
Now that we have a custom component that can receive text, we can take action with the information we receive. To fetch the stock price data, we’ll use the Financial Modeling Prep API. It’s free to use and after you register you’ll see your API Key in the API Documentation section. Take note of your API Key as we’ll make use of it momentarily.

Create a directory called utils in your project directory. In utils, create a file called fetchStockPrice.js. Here we'll create a function to handle fetching the stock price for a given stock ticker symbol:
const fetchStockPrice = async (stockTickerSymbol) => {
  const endpoint = "https://financialmodelingprep.com/api/v3/quote";
  const apiKey = "<Your-API-Key-Here>";
  const response = await fetch(`${endpoint}/${stockTickerSymbol.toUpperCase()}?apikey=${apiKey}`);
  const result = await response.json();
  const { name, price, change } = result[0];
  const changeType = change > 0 ? "+" : "-"

  return {
    stockName: name,
    stockPrice: price.toFixed(2),
    changeValue: change > 0 ? `+${change.toFixed(2)}` : change.toFixed(2),
    changeType: changeType
  }
};

export default fetchStockPrice;
From the API call we make, there’s four pieces of information we return within a JSON object:
stockName: The name of the company e.g. Apple, Inc.stockPrice: The price of the stock with 2 digits after the decimal point.changeValue: This is the difference between the latest stock price and the previous period's closing stock price. If it's not negative, we'll append a+for stylistic purposes.changeType: If the change value was negative we'll return a-, else we'll return a+. We'll make use of this in the next section to change the background color of our component to red or green for visual flair.
Creating a Stock View Component
In this section we’ll create a custom component to display the stock information. We’ll import and use our previously created SearchBar as well, demonstrating how React Native allows you to compose components together.
Create a new file in the components directory called StockView.js. The responsibility of the StockView component will be to receive the stock information and display it. As a result, we can make StockView a functional component instead of a class component. Additionally we will import and use the SearchBar component within StockView. Update your StockView.js file with the contents below:
import React from 'react';
import { View, Text, StyleSheet } from 'react-native';

import SearchBar from './SearchBar';

export default function StockView(props) {
	return (
		<View>
			<Text style={[styles.mediumText, styles.textStyle]}>{props.stockName}</Text>
			<Text style={[styles.largeText, styles.textStyle]}>{props.stockPrice}</Text>
			<View style={[styles.rectangleShapeContainer, props.changeType === "+" ? styles.positiveChange : styles.negativeChange]}>
				<Text style={[styles.smallText, styles.textStyle]}>{props.changeValue}</Text>
			</View>
			<SearchBar
				placeholderTextInputLabelText="Search (e.g. AAPL)"
				onSubmit={props.onSubmit}
			/>
		</View>
	)
}

const styles = StyleSheet.create({
  textStyle: {
    fontFamily: 'AvenirNext-Regular',
    textAlign: 'center',
    color: 'white',
  },
  largeText: {
    fontSize: 45,
  },
  mediumText: {
    fontSize: 35,
  },
  smallText: {
    fontSize: 25,
  },
  rectangleShapeContainer: {
    marginTop: 5,
    marginHorizontal: 160,
    borderRadius: 20,
    justifyContent: 'center',
    backgroundColor: 'green',
  },
  positiveChange: {
    backgroundColor: 'green',
  },
  negativeChange: {
    backgroundColor: 'red',
  },
});
React Native lets us apply conditional styling to components. For example, in this part of our StockView component:
<View style={[styles.rectangleShapeContainer, props.changeType === "+" ? styles.positiveChange : styles.negativeChange]}>
	<Text style={[styles.smallText, styles.textStyle]}>{props.changeValue}</Text>
</View>
We are are changing the view’s background color to either green or red depending if the stock price change was positive or negative.
Refactoring App.js
Now that we have our custom components and a helper function for fetching the stock price, let’s update our App.js and connect everything together. Update your App.js file with the contents below and summarize momentarily:
import React from 'react';
import {
  ImageBackground,
  StyleSheet,
  Text,
  View,
  StatusBar,
  ActivityIndicator
} from 'react-native';

import SearchBar from './components/SearchBar';
import StockView from './components/StockView';
import fetchStockPrice from './utils/fetchStockPrice';

export default class App extends React.Component {
  constructor(props) {
    super(props);
    // Initializing the properties in our local state
    this.state = {
      loading: false,
      error: false,
      stockName: '',
      stockPrice: 0,
      changeType: '+',
      changeValue: 0,
    }
  }

  // Callback function to execute fetchStockPrice(...) and update our local state accordingly
  handleFetchStockPrice = async (stockTickerSymbol) => {
    if (stockTickerSymbol) {
      this.setState({
        loading: true
      }, async () => {
        try {
          const { changeType, changeValue, stockName, stockPrice } = await fetchStockPrice(stockTickerSymbol);

          this.setState({
            error: false,
            loading: false,
            stockName: stockName,
            stockPrice: stockPrice,
            changeType: changeType,
            changeValue: changeValue
          });
        } catch (e) {
          this.setState({
            error: true,
            loading: false
          });
        }
      });
    } else {
      return;
    }
  }

  // This is a React Native lifecyle method
  // componentDidMount() executes immediately after the component (in this case App)
  // is inserted in the view hierarchy
  componentDidMount() {
    this.handleFetchStockPrice('TSLA')
  }

  render() {
    const {
      loading,
      error,
      stockName,
      stockPrice,
      changeType,
      changeValue
    } = this.state;

    return (
      <View style={styles.container}>
        <StatusBar barStyle="light-content" />
        <ImageBackground
          source={require('./assets/background.png')}
          style={styles.imageContainer}
          imageStyle={styles.image}
        >
          <View style={styles.detailsContainer}>
            <ActivityIndicator
              animating={loading}
              color="#007AFF"
              size="large"
            />

            {!loading && error &&
              <View>
                <Text style={[styles.smallText, styles.textStyle]}>
                  Could not load the stock price, please try again.
                </Text>
                <SearchBar
                  placeholderTextInputLabelText="Search (e.g. AAPL)"
                  onSubmit={this.handleFetchStockPrice}
                />
              </View>
            }

            {!loading && !error &&
              <StockView
                stockName={stockName}
                stockPrice={stockPrice}
                changeType={changeType}
                changeValue={changeValue}
                onSubmit={this.handleFetchStockPrice}
              />
            }
          </View>
        </ImageBackground>
      </View>
    );
  }
}

const styles = StyleSheet.create({
  container: {
    flex: 1,
    backgroundColor: 'black',
  },
  textStyle: {
    fontFamily: 'AvenirNext-Regular',
    textAlign: 'center',
    color: 'white',
  },
  smallText: {
    fontSize: 25,
  },
  imageContainer: {
    flex: 1,
  },
  image: {
    flex: 1,
    width: null,
    height: null,
    resizeMode: 'cover',
  },
  detailsContainer: {
    flex: 1,
    justifyContent: 'center',
  }
});- In our
constructor()we are initializing the properties we need in our local state. We'll use theloadingproperty to instruct theActivityIndicatorwhether to show or hide. - We have a callback function
handleFetchStockPriceto help execute ourfetchStockPrice(...)function. Right before we fire off the function, we'll change ourloadingstate property totrueso that ourActivityIndicatorvisually shows in theView. The React NativesetState()method accepts a callback as an optional parameter, and we'll callfetchStockPrice(...)from there. After the call is made, we'll update our state properties accordingly based on whether the request was successful or encountered an error. - React Native has built-in lifecycle methods that allow you to access specific points of time when a component is created, changed, or removed from the view hierarchy. We’re calling
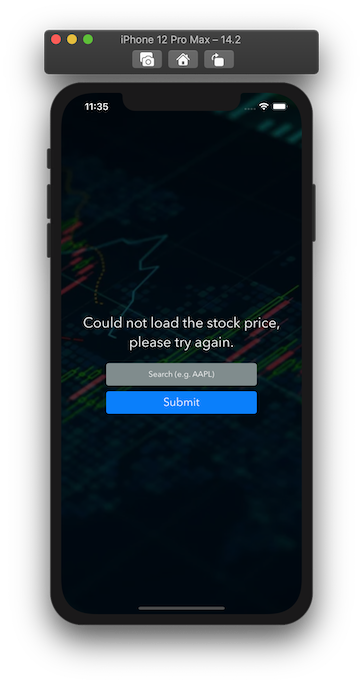
handleFetchStockPrice(...)fromcomponentDidMount()and passing in the string'TSLA', which is the stock ticker symbol for Tesla, as a default value. It's better to call async requests, likehandleFetchStockPrice(...)fromcomponentDidMount()opposed to from theconstructor(), because theconstructor()is called before the component is first mounted. As a result, it's best to use theconstructor()for initializing state. - React Native allows us to conditionally load components based on conditions. For example, in this section of the code:
{!loading && error &&
	<Text style={[styles.smallText, styles.textStyle]}>
	Could not load the stock price, please try again.
	</Text>
}

{!loading && !error &&
	<StockView
	stockName={stockName}
	stockPrice={stockPrice}
	changeType={changeType}
	changeValue={changeValue}
	onSubmit={this.handleFetchStockPrice}
	/>
}
If loading is false and error is true, we will display an error message to the user:
However, if loading is false and error is false, we'll display our custom StockView component. We'll pass down our handleFetchStockPrice(...) callback function to the onSubmit in its props. When our app first loads the 'TSLA' ticker symbol will be used by default. However, when the user inserts their own desired stock price symbol, this gets passed to our SearchBar component within StockView along with the handleFetchStockPrice(...) callback, allowing us to fetch new stock price data after the user as submitted their input.
Go ahead and try out your newly created stock price app!
Next Steps
Congratulations, you now have a working native mobile app that runs on both iOS and Android! In Part 2 of this series we will refactor our app to make it automation test friendly. Lastly, in Part 3 we will add WebdriverIO to our project and write an automation test for our app.
Member discussion