Testing Android and iOS apps in TypeScript using WebdriverIO
Using TypeScript in conjunction with WebdriverIO, we can develop automation tests for our Android and iOS apps that replicate the same user interactions a human would perform — all from one language. As we incrementally develop new features in our apps, we can execute and maintain these tests solely in TypeScript, without context switching between Kotlin and Swift. But most importantly, through having automation tests, we gain assurance that our code changes haven’t negatively altered the user experience in our apps. In this concise guide we will walkthrough how to setup a WebdriverIO project in TypeScript. We will target the native Android Contacts app for demonstration purposes.
You can find the full source code to this guide here:
 nathankrishnan
Contents of this Guide
● What is TypeScript and Why Should I Use It?
● What is WebdriverIO?
● Setting Up a Project
- Prerequisite: Installing Node.js
- Project Setup
- Set our installed Node version
- Initialize the package.json
- Install TypeScript
- Create a TypeScript Config File
- Install ts-node
- Install WebdriverIO
- Install Mocha
- Install Appium Server
● Structuring a Test Suite
- Project File Structure
- Desired Capabilities for the Project
- View Objects
- Test Suite
- Helper Methods
- Executing the Test Suite
What is TypeScript and Why Should I Use It?
TypeScript is a superset of JavaScript that provides optional static types. It’s an excellent language of choice for writing automation tests for the following reasons:
- Minimal Learning Curve: If you’ve used JavaScript before, you’ll be able to pick up TypeScript quickly since valid JavaScript is valid TypeScript. This is what makes TypeScript accessible to a wide audience of backgrounds, whether they are software engineers, QA testers, designers, product managers, etc.
- Bug detection: Mistakes like typos, missing parameters, and mismatched types will be detected at compile time.
- Ease of Refactoring: Due to the aforementioned bug detection benefit, you can modify objects, functions, modules, etc. with confidence knowing that mistakes will be caught at compile time.
- Intelligent Code Completion: Popular IDE’s such as Visual Studio Code and JetBrains WebStorm have out-of-the box support for TypeScript and provide code completion suggestions as you type. Likewise if you use VIM or Emacs, there are excellent community plugins for TypeScript syntax support and code completion.
Now that we’ve established TypeScript as a great language choice, let’s discuss what WebdriverIO is and how you can use it in conjunction to develop automation tests for iOS, Android, and Web Apps.
What is WebdriverIO?
There’s a lot to say about WebdriverIO, as it’s feature rich. However for our purposes, you can pragmatically think of it as a client wrapper around Appium and Selenium that provides an API for interacting with apps on a device or web browser. If you’ve written Appium or Selenium tests before in other languages, you can think of WebdriverIO as the TypeScript version of your Appium or Selenium client.
Setting Up a Project
Prerequisite: Installing Node.js
I’ll give a personal recommendation momentarily for those on macOS, but in general you can refer to the official Node.js website for detailed information:
If you’re on macOS, there’s a convenient language runtime manager called asdf that I recommend. It provides a single CLI tool you can use for installing Node, Java, Python, and other languages. For those that have used nvm before, it’s like a generalized nvm, but inclusive of other languages. You can install it using Homebrew:
$ brew install asdfWe can then add the Node.js plugin to asdf:
$ asdf plugin add nodejs <https://github.com/asdf-vm/asdf-nodejs.git>Now we can install a version of Node.js. We can either select a specific version to install or the latest version. Let’s go ahead and and install the latest current version, which as of the time of this blog post is 16.7.0:
# List available Node.js versions
$ asdf list all nodejs

# Install the latest
$ asdf install nodejs 16.7.0
Note: Node.js 16.X has Apple Silicon support, which is why I recommend using it if you’re on a M1 Mac. However, if you were to use Node.js 14.X instead that’s fine too, there won’t be any negative impact with respect to running this project.
Project Setup
Open a terminal and navigate to a directory that will contain the project’s files. For example, I’ll create a directory called webdriverio-typescript-appium-reference in my home directory for this project.
$ mkdir ~/webdriverio-typescript-appium-reference && cd ~/webdriverio-typescript-appium-referenceSet our installed Node version to the Project
We previously installed a version of Node.js and now we can set our project to use it by running in our project directory:
$ asdf local nodejs 16.7.0This will create a .tool-versions file in our project directory that we can inspect to confirm the version number set in our project.
Initialize the package.json
The package.json file contains important information about our project, such as the npm package dependencies that we use.
To initialize our package.json we can run:
$ npm init --yesNote: The --yes flag creates a package.json with default values. If we exclude this flag, we will be prompted to answer several questions about our project, such as the name, description, etc.
Install TypeScript
To install the latest version of TypeScript, run the following command:
$ npm install --save-dev typescriptNote: The --save-dev flag ensures that the package we're installing is installed in our current directory, opposed to installing it globally. After installing it with this flag, you'll see the package listed under the devDependencies list in the package.json.
We can confirm the install was successful by running the following command to print the version number:
$ npx tsc -vNote: npx is a convenient shortcut for running executables from our project's local node_modules directory. tsc is an executable that was installed for us when we issued the earlier command to install TypeScript. The name tsc is an acronym for TypeScript Compiler. If we didn't use the npx shortcut, we would need to run the following command:
$ ./node_modules/.bin/tsc -vThe latest version of TypeScript is 4.3.5 at the time of this blog post.
Create a TypeScript Config File (tsconfig.json)
The job of the TypeScript compiler is to take our TypeScript .ts files and generate the JavaScript equivalent files .js as output for execution. In a given TypeScript project we can create a configuration file, tsconfig.json, for the TypeScript compiler to specify our preferences. The configuration file can either be created manually or automatically generated. There's only a few options we need, so we can manually create a tsconfig.json in our project's directory with the following
{
  "compilerOptions": {
    "target": "es6",
    "module": "commonjs",
    "esModuleInterop": true,
    "forceConsistentCasingInFileNames": true
  }
}
Note: To automatically generate a configuration file for our project, we could alternatively run npx tsc --init --strict. As the flag name suggests, --strict will enable the strictest mode in the type issue catching system to aid with warnings before and during compile time.
If you open the tsconfig.json you will see a JSON object with certain key/value pair enabled. Here's a brief description and overview what these mean:
target: this option specifies the version of ECMAScript that the compiler will output when generated JavaScript from our TypeScript files.module: this option specifies the module system that we are using in the generated code. With this set tocommonjs, we'll have compatibility with Node.js's module system.esModuleInterop: this option ensures we'll have compatibility between CommonJS and ES Module formats.forceConsistentCasingInFileNames: this option ensures that we don't introduce bugs by accidentally importing a module using incorrect casing.
Install ts-node
ts-node is a utility for execute TypeScript programs directly from the Terminal without having to first compile the .ts files to .js and then execute the generated .js files. You can think of it as a shortcut for node command when working in TypeScript. Just like the node command, if we run ts-node with no arguments, we will be placed in an interactive REPL mode. This is helpful for testing short snippets of node.
To install ts-node run the following command:
$ npm install --save-dev ts-nodeWe can confirm it installed successfully by printing the version number:
$ npx ts-node -vThe latest version of ts-node is v10.2.1 as of the time of writing this blog post.
Install WebdriverIO
We can download the standalone WebdriverIO package via:
$ npm install --save-dev webdriverioInstall Mocha
Mocha is a popular framework for structuring and running test suites, traditionally used by developers writing unit tests in JavaScript projects. Although not a hard requirement here, as we can write our automation logic without it, it helps provide a uniform template for structuring test suites, which helps with project organization once your test suite grows from the increase in test cases written. We can install it via:
$ npm install --save-dev mochaMocha provides custom framework objects and we can download the associated types for these objects so they are recognized as valid by the TypeScript compiler:
$ npm install --save-dev @types/mochaInstall Appium Server
WebdriverIO acts as our Appium client, but we need to also run Appium Server, which will act as a bridge to translate what we want to perform in our tests to the necessary logic in either UIAutomator2 or XCUITest. If you are testing a Web Application, this is not needed and instead you’ll need the corresponding Browser driver (e.g. chromedriver for Chrome).
$ npm install appium
Structuring a Test
Project File Structure
In this section we’ll walkthrough one way to structure a test. For this example, we’ll target the native Android Contacts app that’s default on the Android Emulator.
For our example project, we’ll structure it in this manner:
android/
   ├── androidContacts.ts
   ├── projectCapabilities.ts
   ├── utils.ts
   └── viewObjects/
└── androidContacts.ts- Create a directory called
android. For other platforms we want to target in the future (e.g.ios) we can create associated directories for organization. - Within the
androiddirectory, create the following files:androidContacts.ts,projectCapabilities.ts, andutils.ts. - Create a directory in
androidcalledviewObjects. Within theviewObjectsdirectory create a file calledandroidContacts.ts.
Now that we know what the structure contains, I’ll explain the methodology behind why it is structured this way.
We created a directory called android that will contain our test suites for targeting Android apps, in this case the Android Contacts app.
Within the android directory we have:
- A file called
androidContacts.tsthat will contain our test suite. This is the file we'll execute when we want to run our test. - A file called
projectCapabilities.tsthat will have our desired capabilities specifying the device and app we'll run against. - A file called
utils.tsthat will have helper methods for finding, tapping, and sending input to elements. - A directory named
viewObjectsthat contains one file also calledandroidContacts.ts. OurviewObjectsdirectory will contain files that contain the element references within the view of our target app. In terms of naming convention, we went with mapping the name of the View Object to the corresponding Test Suite, which is why we have aviewObjects/androidContacts.tsand aandroidContacts.ts.
Desired Capabilities for our Project
We’ll start with providing our desired capabilities in our projectCapabilites.ts file. Desired capabilities are a JSON object that contain the configuration options for our test. For more information, take a look at this section of the official Appium documentation. At minimum we need to provide:
platformName: eitherAndroidoriOS.deviceName: For an iOS test this would be the name of the device that Xcode Instruments uses. In other words the name returned when you runinstruments -s devices. For Android, there is no strict enforcement of the name you supply.appPackageandappActivity(Android): If you have the Android project source code, this is straightforward. However, even if you don't, there are other alternative ways to determine them. For example you could useadb(e.g.adb shell pm list packages) or decompile the.apkand take a look at theAndroidManifest.xmlfile. For more info on the Android Manifest file, take a look at this section of the official Android developer documentation.bundleId(iOS): If you have the Xcode Project or Workspace file, this is also straightforward. If you do not, I recommend downloading ilibmobiledevice, which includesideviceinstaller, an open source CLI tool for managing apps on iOS devices. With this tool you can runideviceinstaller --list-appsto get the bundle Id.automationName: For an Android test we can useUiAutomator2and for iOS useXCUITest.
The appPackage name for the Android Contacts app is com.android.contacts and its associated appActivity is com.android.contacts.activities.PeopleActivity.
// File: projectCapabilites.ts

import { RemoteOptions } from "webdriverio";

class ProjectCapabilities {

 private static webDriverPath: string = '/wd/hub';
 private static webDriverPort: number = 4723;

 static androidBaseCapabilities(appPackage: string = "com.android.contacts", appActivity: string = "com.android.contacts.activities.PeopleActivity", additionalCaps?: object): RemoteOptions {

 const desiredCapabilities = {
   platformName: "Android",
   deviceName: "Android Emulator",
   appPackage: appPackage,
   appActivity: appActivity,
   automationName: "UiAutomator2",
   ...additionalCaps
  };

 return {
   path: this.webDriverPath,
   port: this.webDriverPort,
   capabilities: desiredCapabilities
  }
 }
}

export default ProjectCapabilities;
View Objects
Being able to find elements and perform actions on them is crucial for writing automation tests. We can then create class objects in TypeScript, which I’ll refer to as View Objects, to represent the references of elements that appear in the view for our app. To determine the what the element references are, we can use Appium Desktop to inspect the app:
https://github.com/appium/appium-desktop/releases
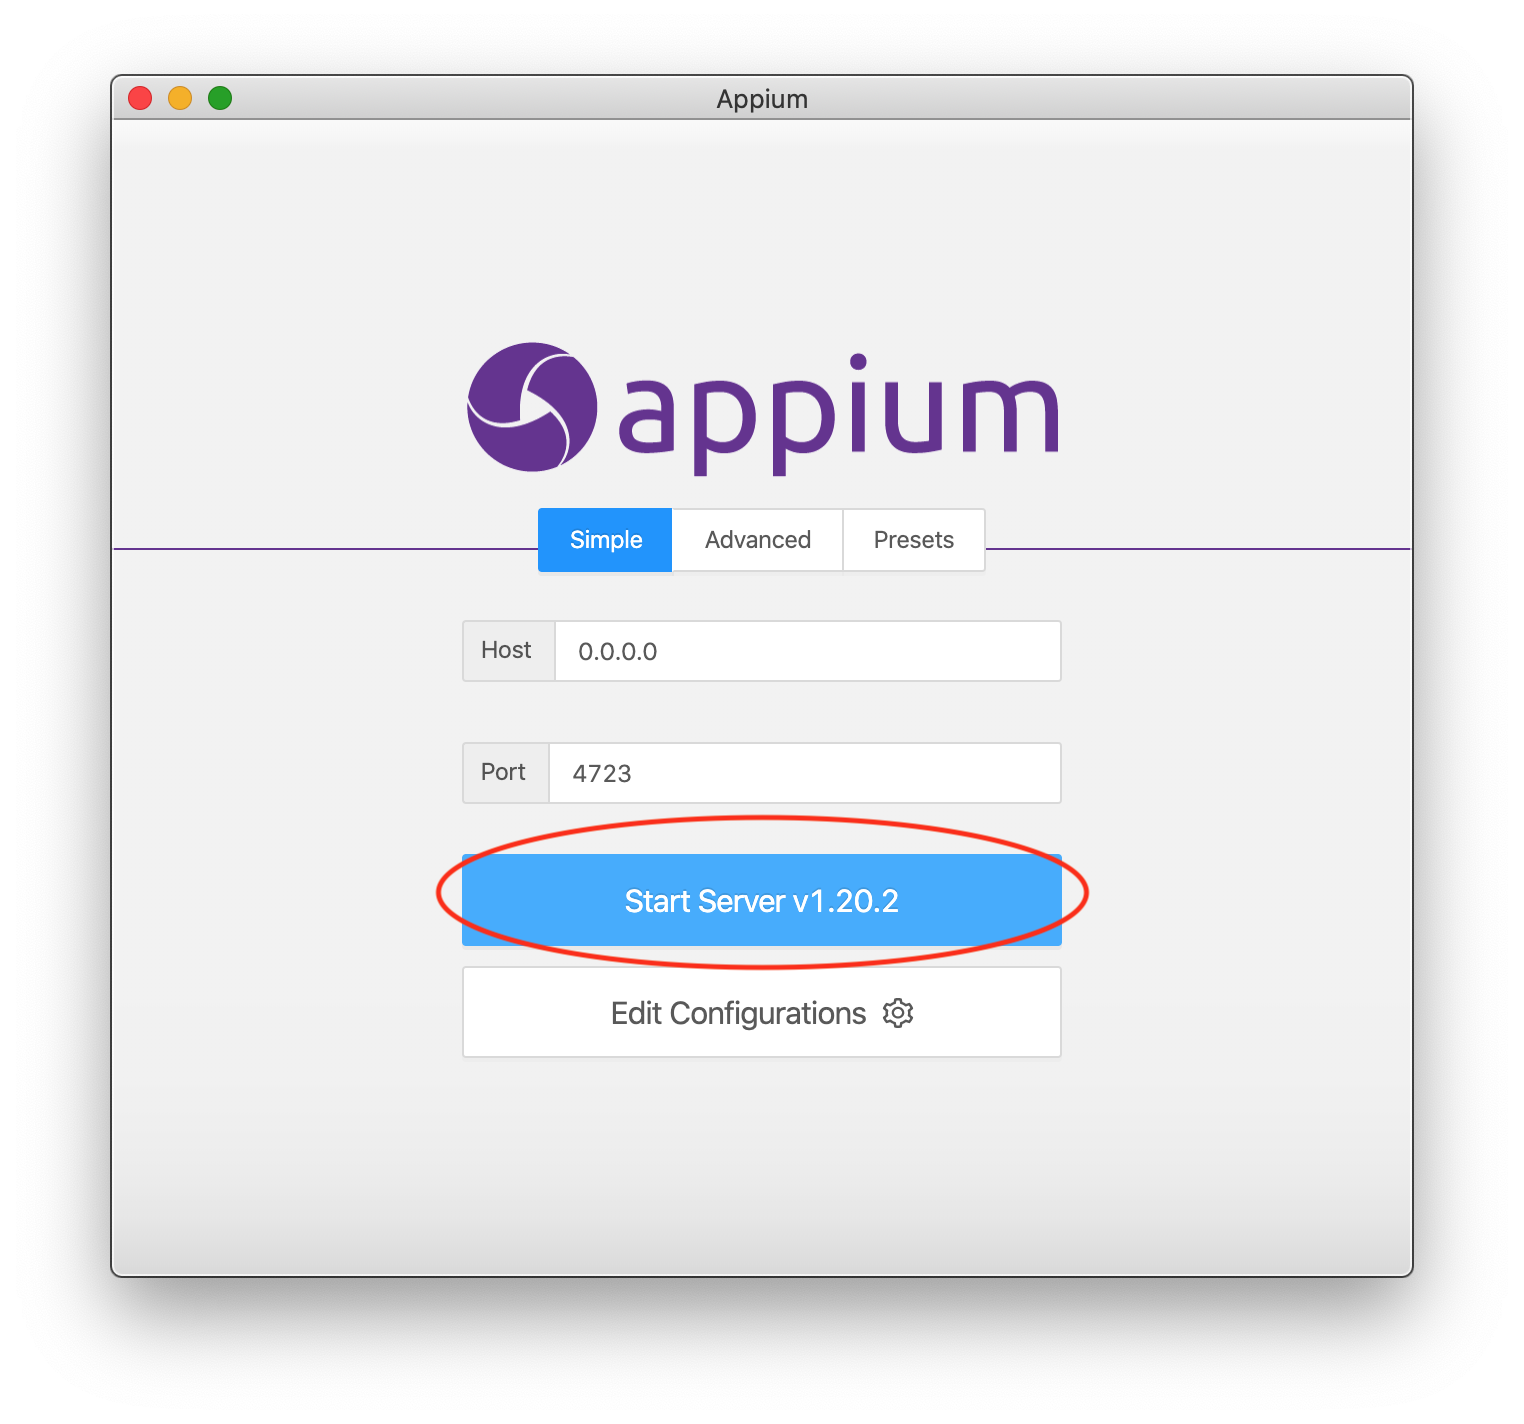
Download the binary for your platform and launch it. Appium Desktop is a GUI tool for exploring the elements in the view of a given app so we can understand how to reach elements and perform associated actions on them in our tests. When Appium Desktop is launched click on “Start Server”.
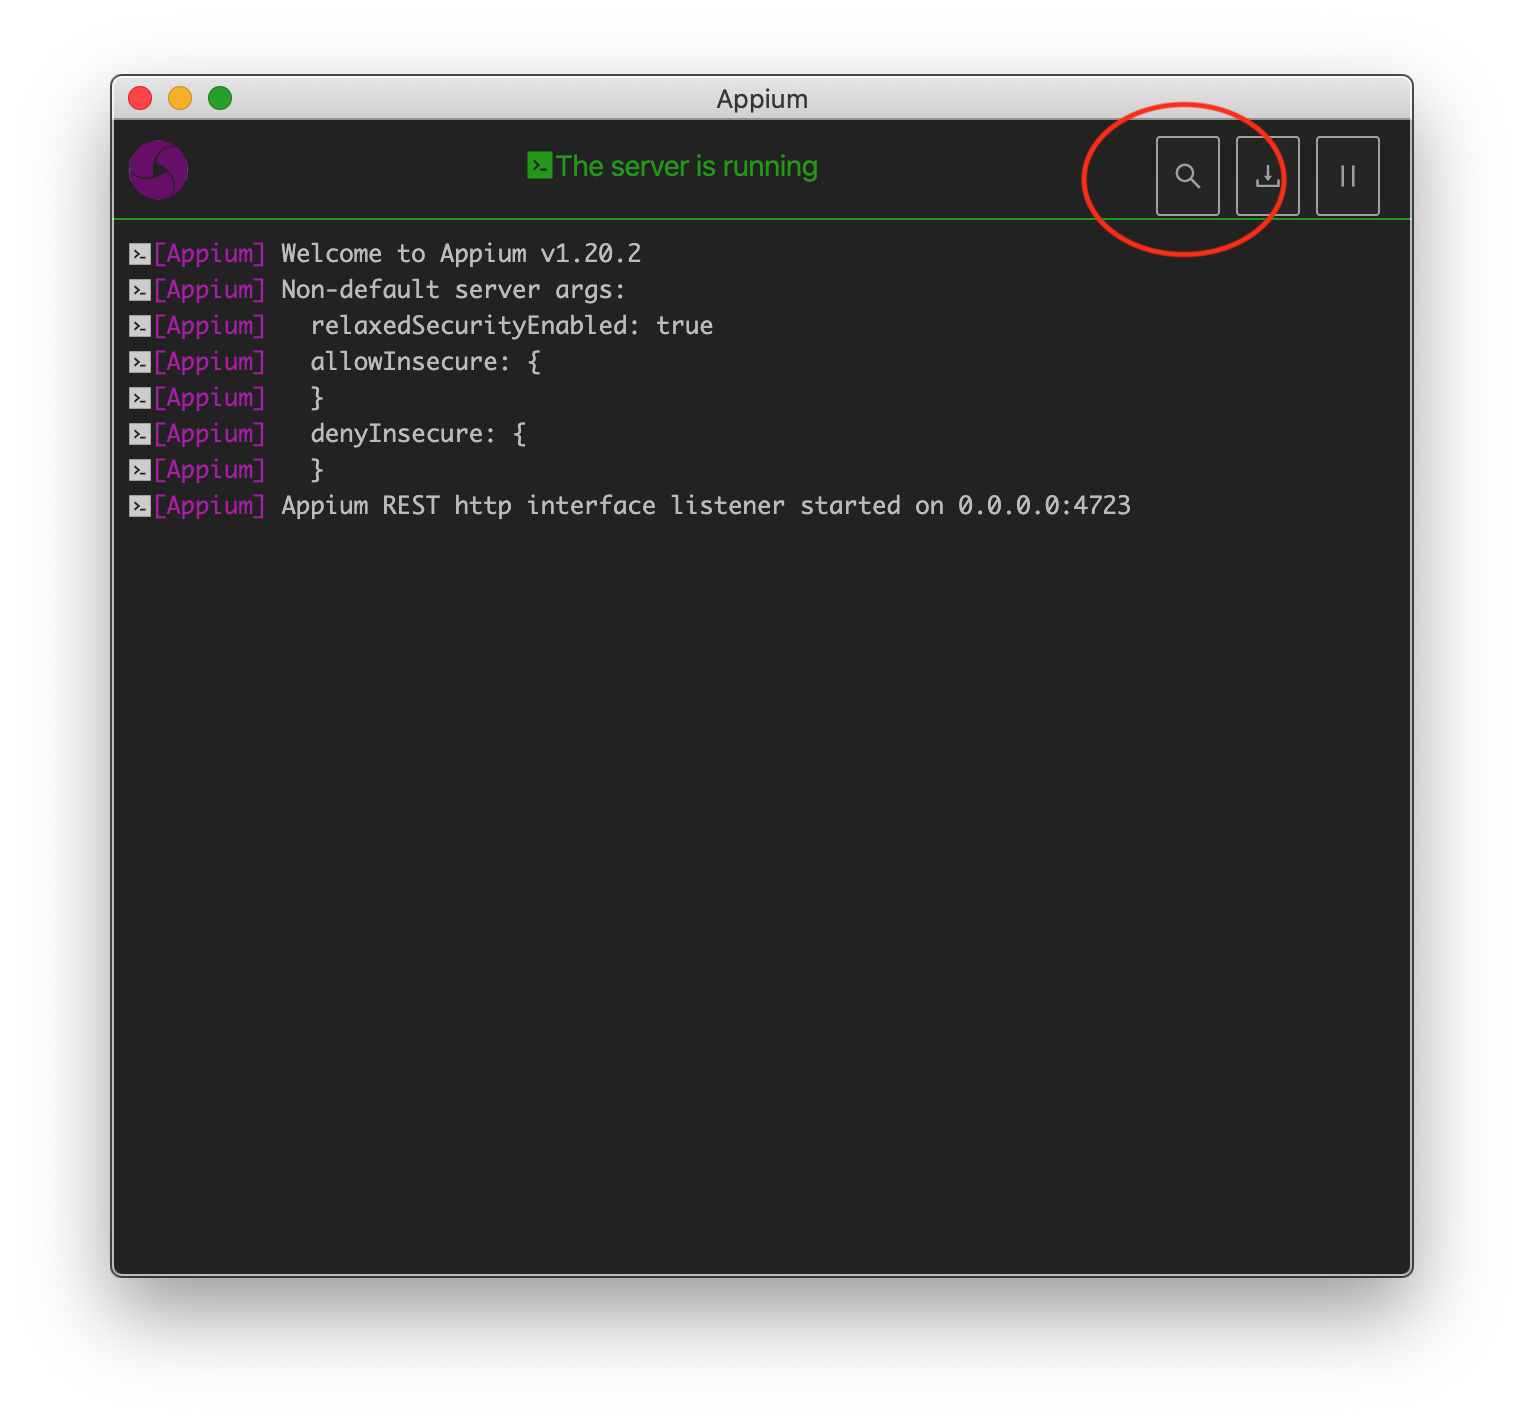
Next, click the magnifying glass icon at the top right corner.
This will allow us to specify the Desired Capabilities use in our session. We’ll use the same exact Desired Capabilities from the previous section:
{
  "platformName": "Android",
  "automationName": "UiAutomator2",
  "deviceName": "Android Emulator",
  "appPackage": "com.android.contacts",
  "appActivity": "com.android.contacts.activities.PeopleActivity"
}
After this, we can press the “Start Session” Button to invoke our inspector session.
Note: Ensure that your emulator/simulator/physical device is available before starting the session.
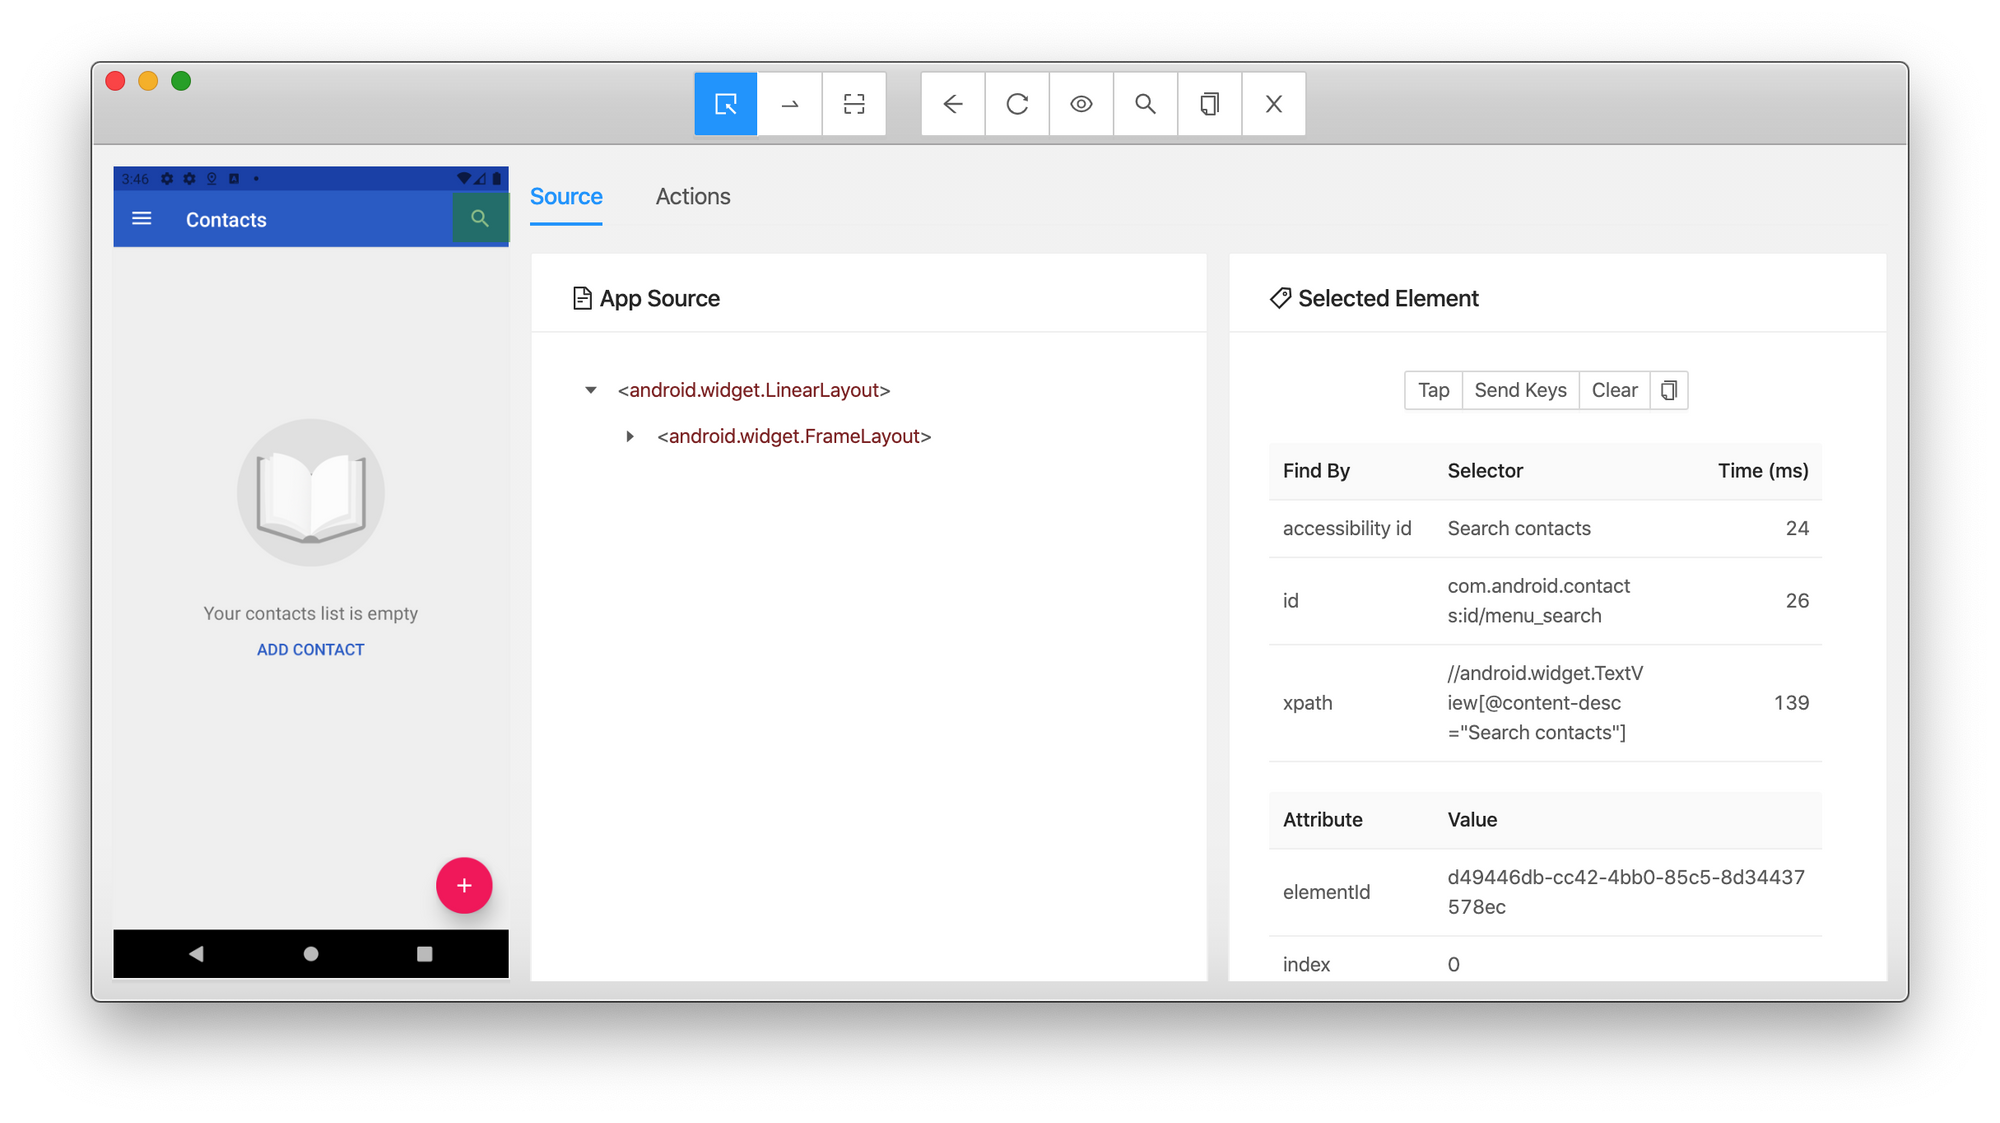
We now need to get references to the elements present in the view. This process is called determining the selector strategy and I’d recommend taking a look at the Find Elements section of the official Appium documentation.
The TL;DR here is that a direct reference (e.g. accessibility ID or a native element ID) is preferable because it’s the quickest route to the element. If that’s not possible we can try using the native element locator APIs for the particular platform (e.g. UiSelector API for Android or iOSClassChain for iOS).
After gathering our element references, we can create a class in TypeScript that contains them. This is what our viewObjects/androidContacts.ts file contains:
import { Browser } from "webdriverio";

class AndroidContacts {
  public static locators = {
    floatingActionButton: "id:com.android.contacts:id/floating_action_button",
    firstNameTextField: "new UiSelector().text(\\"First name\\")",
    lastNameTextField: "new UiSelector().text(\\"Last name\\")",
    saveButton: "id:com.android.contacts:id/editor_menu_save_button",
    moreOptionsMenuButon: "new UiSelector().description(\\"More options\\")",
    moreOptionsMenuDeleteButton: "new UiSelector().text(\\"Delete\\")",
    deleteContactConfirmationButton: "new UiSelector().text(\\"DELETE\\")"
  }
}

export default AndroidContacts;
Test Suite
Now we can create our test case for our test suite. Using the Mocha framework we can organize our suite using the following structure:
// Our Test Suite Name
describe('Test Suite Name', function() {

  // Setup code we can run before our test case starts
  before(function() {

  });

  // Our Test Case
  it('Test Case Name', function() {
  });

  // Teardown code we can run after our test case has executed
  after(function() {
  });
});describe()will encompass our test suite in its entirety.- In the
before()hook we can start our session based on our project's desired capabilities. - We can create test cases by adding
it()blocks. In this case we just need one test case. In theit()block we can write our test case logic. - In the
after()hook we can perform any actions before we tear down and end our test.
For more information on the structure provided by the Mocha framework, please take a look at the Getting Started section of the official Mocha documentation.
Helper Methods
In a previous section we created a View Object with the location of element references. We can utilize these references to tap button elements and also send input to text fields. To facilitate this, we’ll create helper methods. This is what our utils.ts file will contain:
import { Browser, Element } from "webdriverio";

// Wait up to 5 seconds
const MAX_ELEMENT_WAIT_THRESHOLD_MS = 5000;

async function findElement(driver: Browser<"async">, elementLocator: string, timeout: number = MAX_ELEMENT_WAIT_THRESHOLD_MS) {
	const element: Element<"async"> = await driver.$(elementLocator);
	await element.waitForExist({
		timeout: timeout
	});
	return element;
}

async function tapElement(driver: Browser<"async">, elementLocator: string, timeout: number = MAX_ELEMENT_WAIT_THRESHOLD_MS) {
	const element: Element<"async"> = await findElement(driver, elementLocator, timeout);
	return element.click();
}

async function setValueOfElement(driver: Browser<"async">, elementLocator: string, value: string, timeout: number = MAX_ELEMENT_WAIT_THRESHOLD_MS) {
	const element: Element<"async"> = await findElement(driver, elementLocator, timeout);
	await element.setValue(value)
}

export { tapElement, setValueOfElement };
We’ll create three functions:
findElement(): given an element locator reference, check to see if the element exists in the current view. We'll wait up to 5 seconds to see if the element exists and return it.tapElement(): first runfindElement()and then perform a tap action.setValueOfElement(): first runfindElement()and then send an input value to the element.
Now we are ready to write our test! This is what our androidContacts.ts file will contain:
import { remote, RemoteOptions, Browser } from "webdriverio";
import ProjectCapabilities from "./projectCapabilities";
import AndroidContacts from "./viewObjects/androidContacts";
import { tapElement, setValueOfElement } from "./utils";

describe('Android Contacts App Test', function () {
	let driver: Browser<"async">;
	this.timeout(40000);

	before(async function () {
		const remoteOptions: RemoteOptions = ProjectCapabilities.androidBaseCapabilities();
		driver = await remote(remoteOptions);
	});

	it('Add new contact', async function () {
		// Tap the floating action button
		await tapElement(driver, AndroidContacts.locators.floatingActionButton);
		// Provide a first and last name to the input fields
		// then tap the save button
		await setValueOfElement(driver, `android=${AndroidContacts.locators.firstNameTextField}`, "Satoshi");
		await setValueOfElement(driver, `android=${AndroidContacts.locators.lastNameTextField}`, "Nakamoto");
		await tapElement(driver, AndroidContacts.locators.saveButton);
		// Tap the options menu button
		await tapElement(driver, `android=${AndroidContacts.locators.moreOptionsMenuButon}`);
		// Tap the delete button
		await tapElement(driver, `android=${AndroidContacts.locators.moreOptionsMenuDeleteButton}`);
		// Tap the delete confirmation button
		await tapElement(driver, `android=${AndroidContacts.locators.deleteContactConfirmationButton}`);
	});

	after(async function () {
		await driver.deleteSession();
	});
});
Executing the Test Suite
Mocha provides a test runner we can use to execute. For example we can run:
$ npx mocha -r ts-node/register 'android/*.ts'And this will run our androidContacts.ts test suite. The Mocha test runner can pick up our test suite because we're using Mocha's framework hooks (e.g. describe(), it(), etc.)
For added convenience, we can add this command to the scripts section of our package.json:
{
  "name": "blog-webdriverio-typescript",
  "version": "1.0.0",
  "description": "",
  "main": "index.js",
  "scripts": {
    "android-tests": "mocha -r ts-node/register 'android/*.ts'"
  },
  "keywords": [],
  "author": "",
  "license": "ISC",
  "devDependencies": {
    "@types/mocha": "^9.0.0",
    "mocha": "^9.0.3",
    "ts-node": "^10.2.1",
    "typescript": "^4.3.5",
    "webdriverio": "^7.10.0"
  }
}
Note: we don’t need to prefix the mocha command with npx here.
Now we can run npm run android-tests as a shortcut to perform the same command. When we expand our tests, for example add tests for the iOS contacts app, we can add additional commands in the "scripts" section.
The End
That’s it we’re done! 🎉 You now have the prerequisite setup required for creating mobile app automation tests in TypeScript.
Separately, I’m currently working on a platform that enables developers to efficiently diagnose, resolve, and optimize their automation tests. We currently have an ongoing beta program for users to try it and if you want an invitation you can join the waitlist here. Just click on “Request an Invite.”
Member discussion